

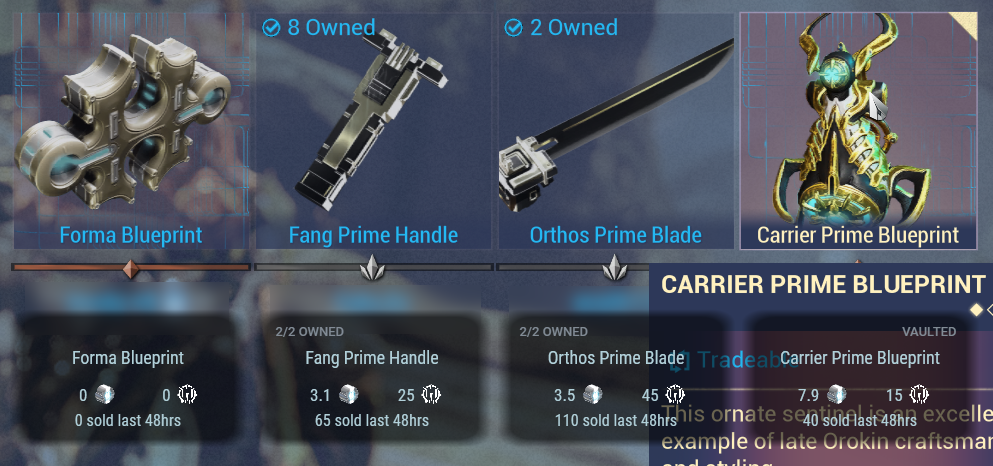
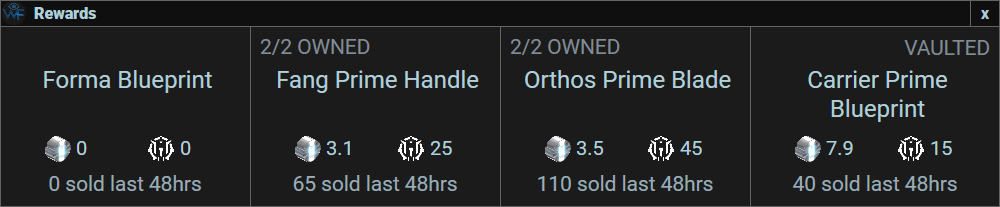
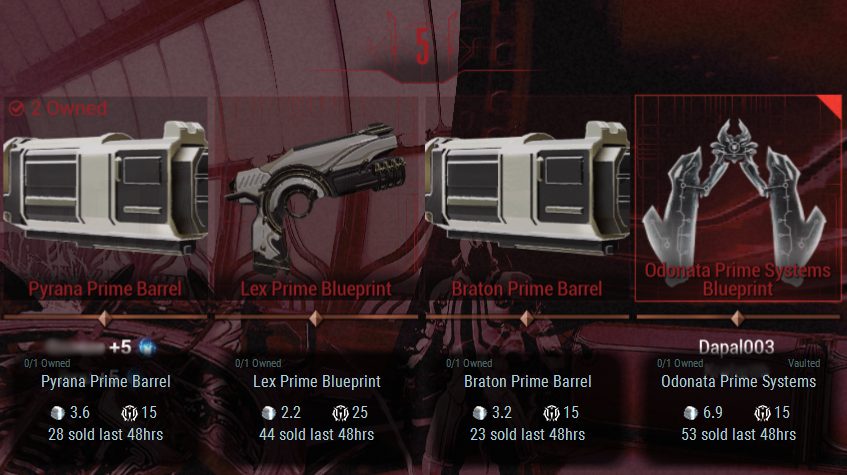
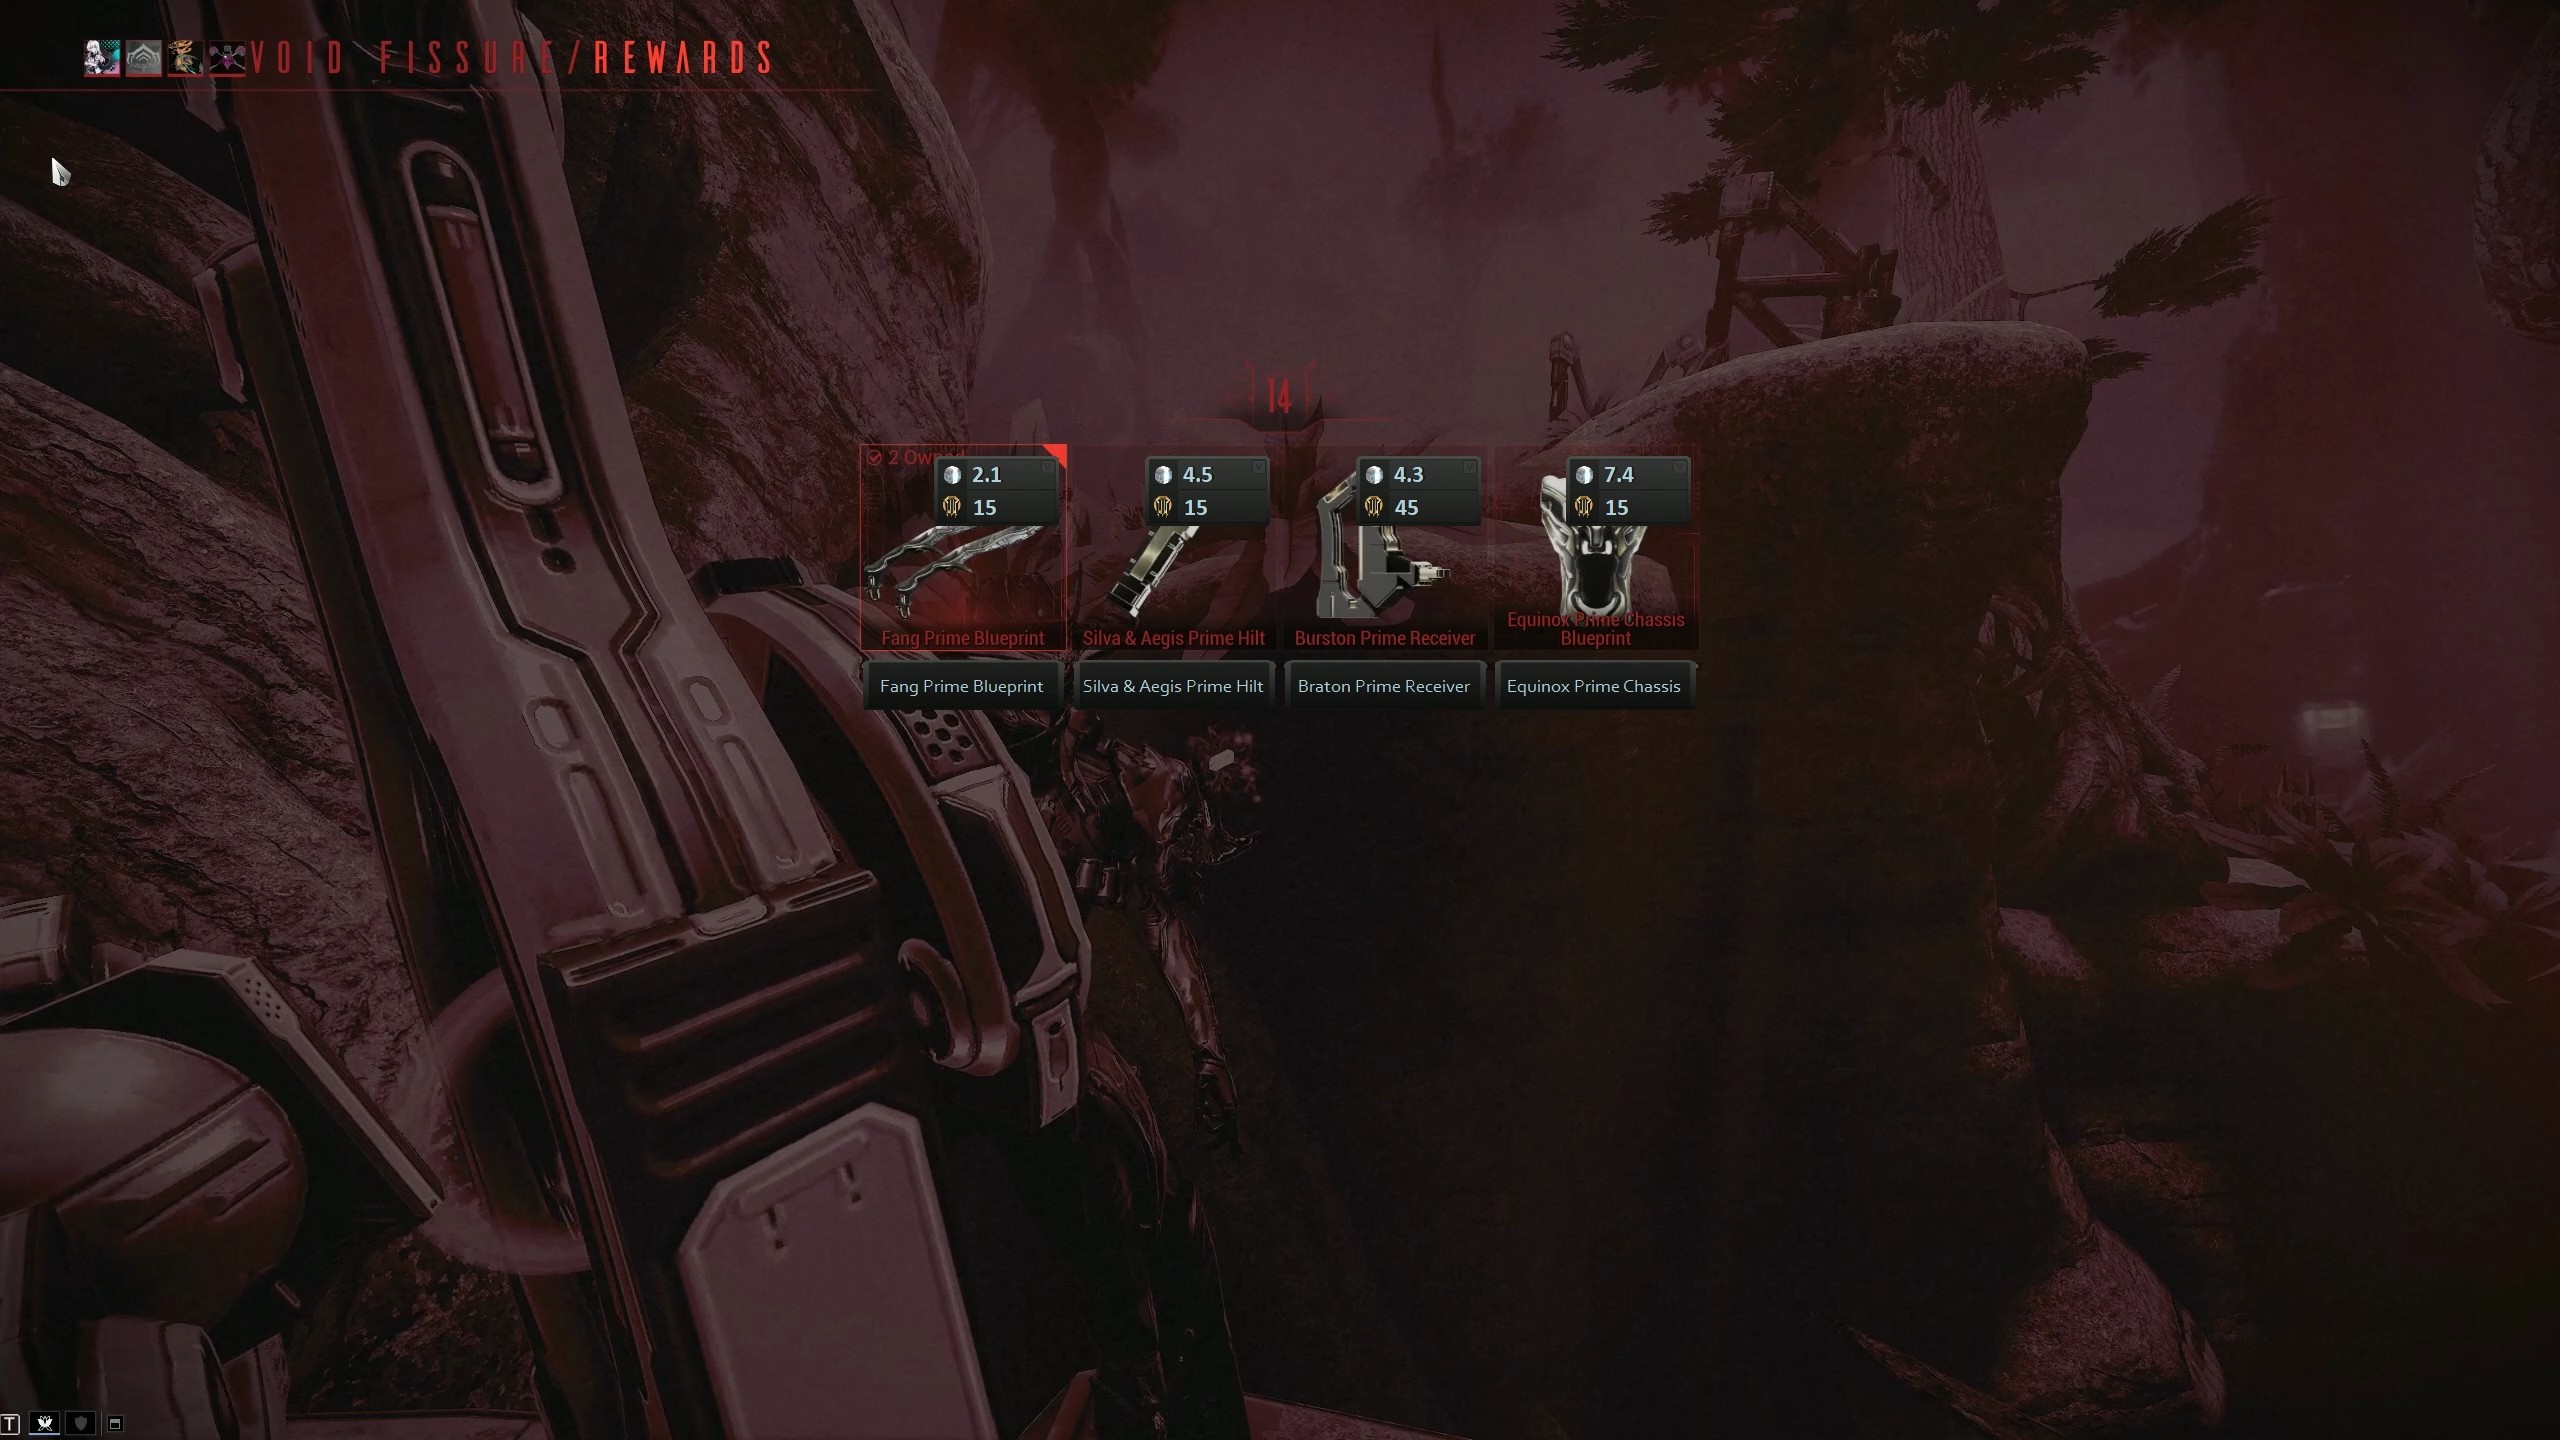
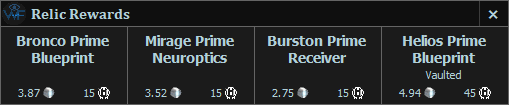
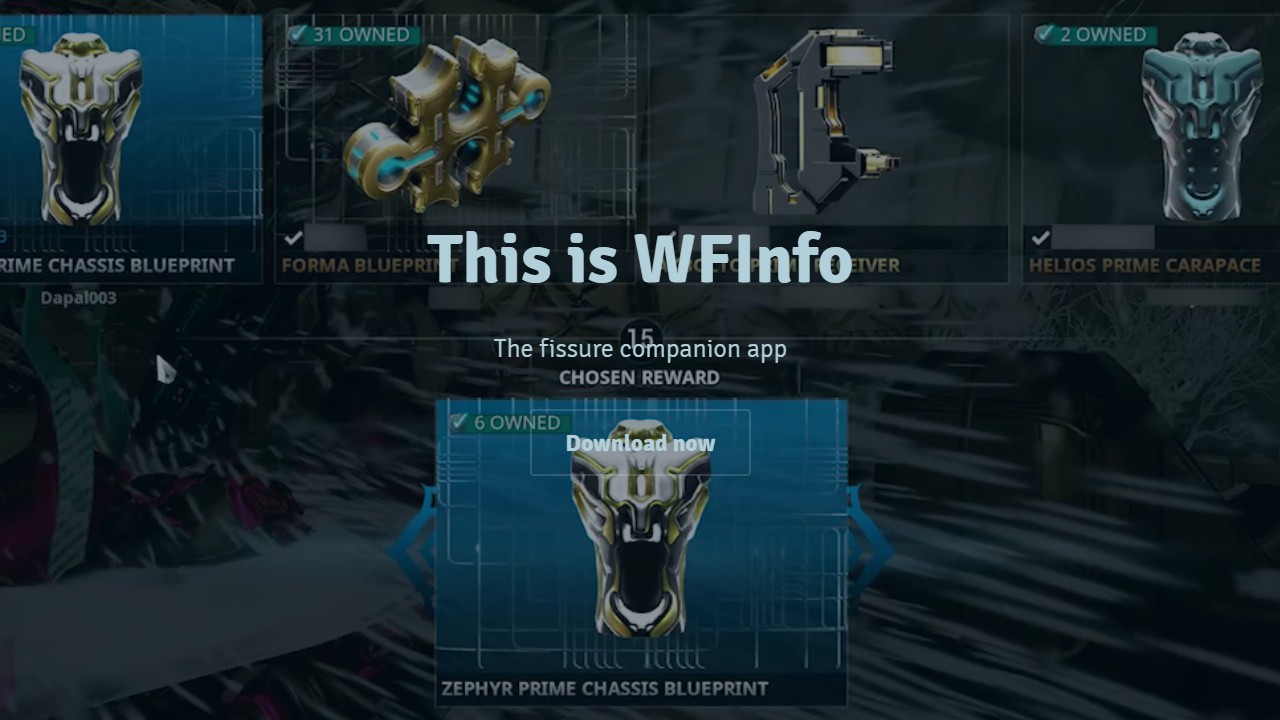
WFInfo gives you info on each reward
Current version 9.5.6
Usage
Download the latest release from above, WFinfo requires some aditional software to function properly:
Download Microsoft Visual C++ Redistributable 2019 (or later) from microsoft x64 and x86
For Windows 7 users: Enable TLS in registry and ensure you have installed .NET Framework Runtime 4.8
Run WFInfo.exe and wait for it to complete the initial load (databases + OCR data)
Under Video inside Warframe settings, set Display Mode to Borderless Fullscreen. You may want to enable Optimized Flip-Model.
Under Interface inside Warframe settings, open Customize UI Theme and turn on Item Labels.
Press the hotkey print screen on a fissure reward screen to show the display, or simply wait if you use the auto feature
When the program does not seem to function, do not spam the hotkey. This will create un-nessesary noise that will make debugging more difficult
Either as an overlay
Or as a window
How to use all the features
A quick rundown on all the things you can do inside WFInfo
TheKengineer made an excelent video showcasing the program and it's features as of v9.4.1
Note! This video wasn't sponsored by the WFInfo developers, we are not affiliated with TheKengineer just found it and thought it explained our application very well!
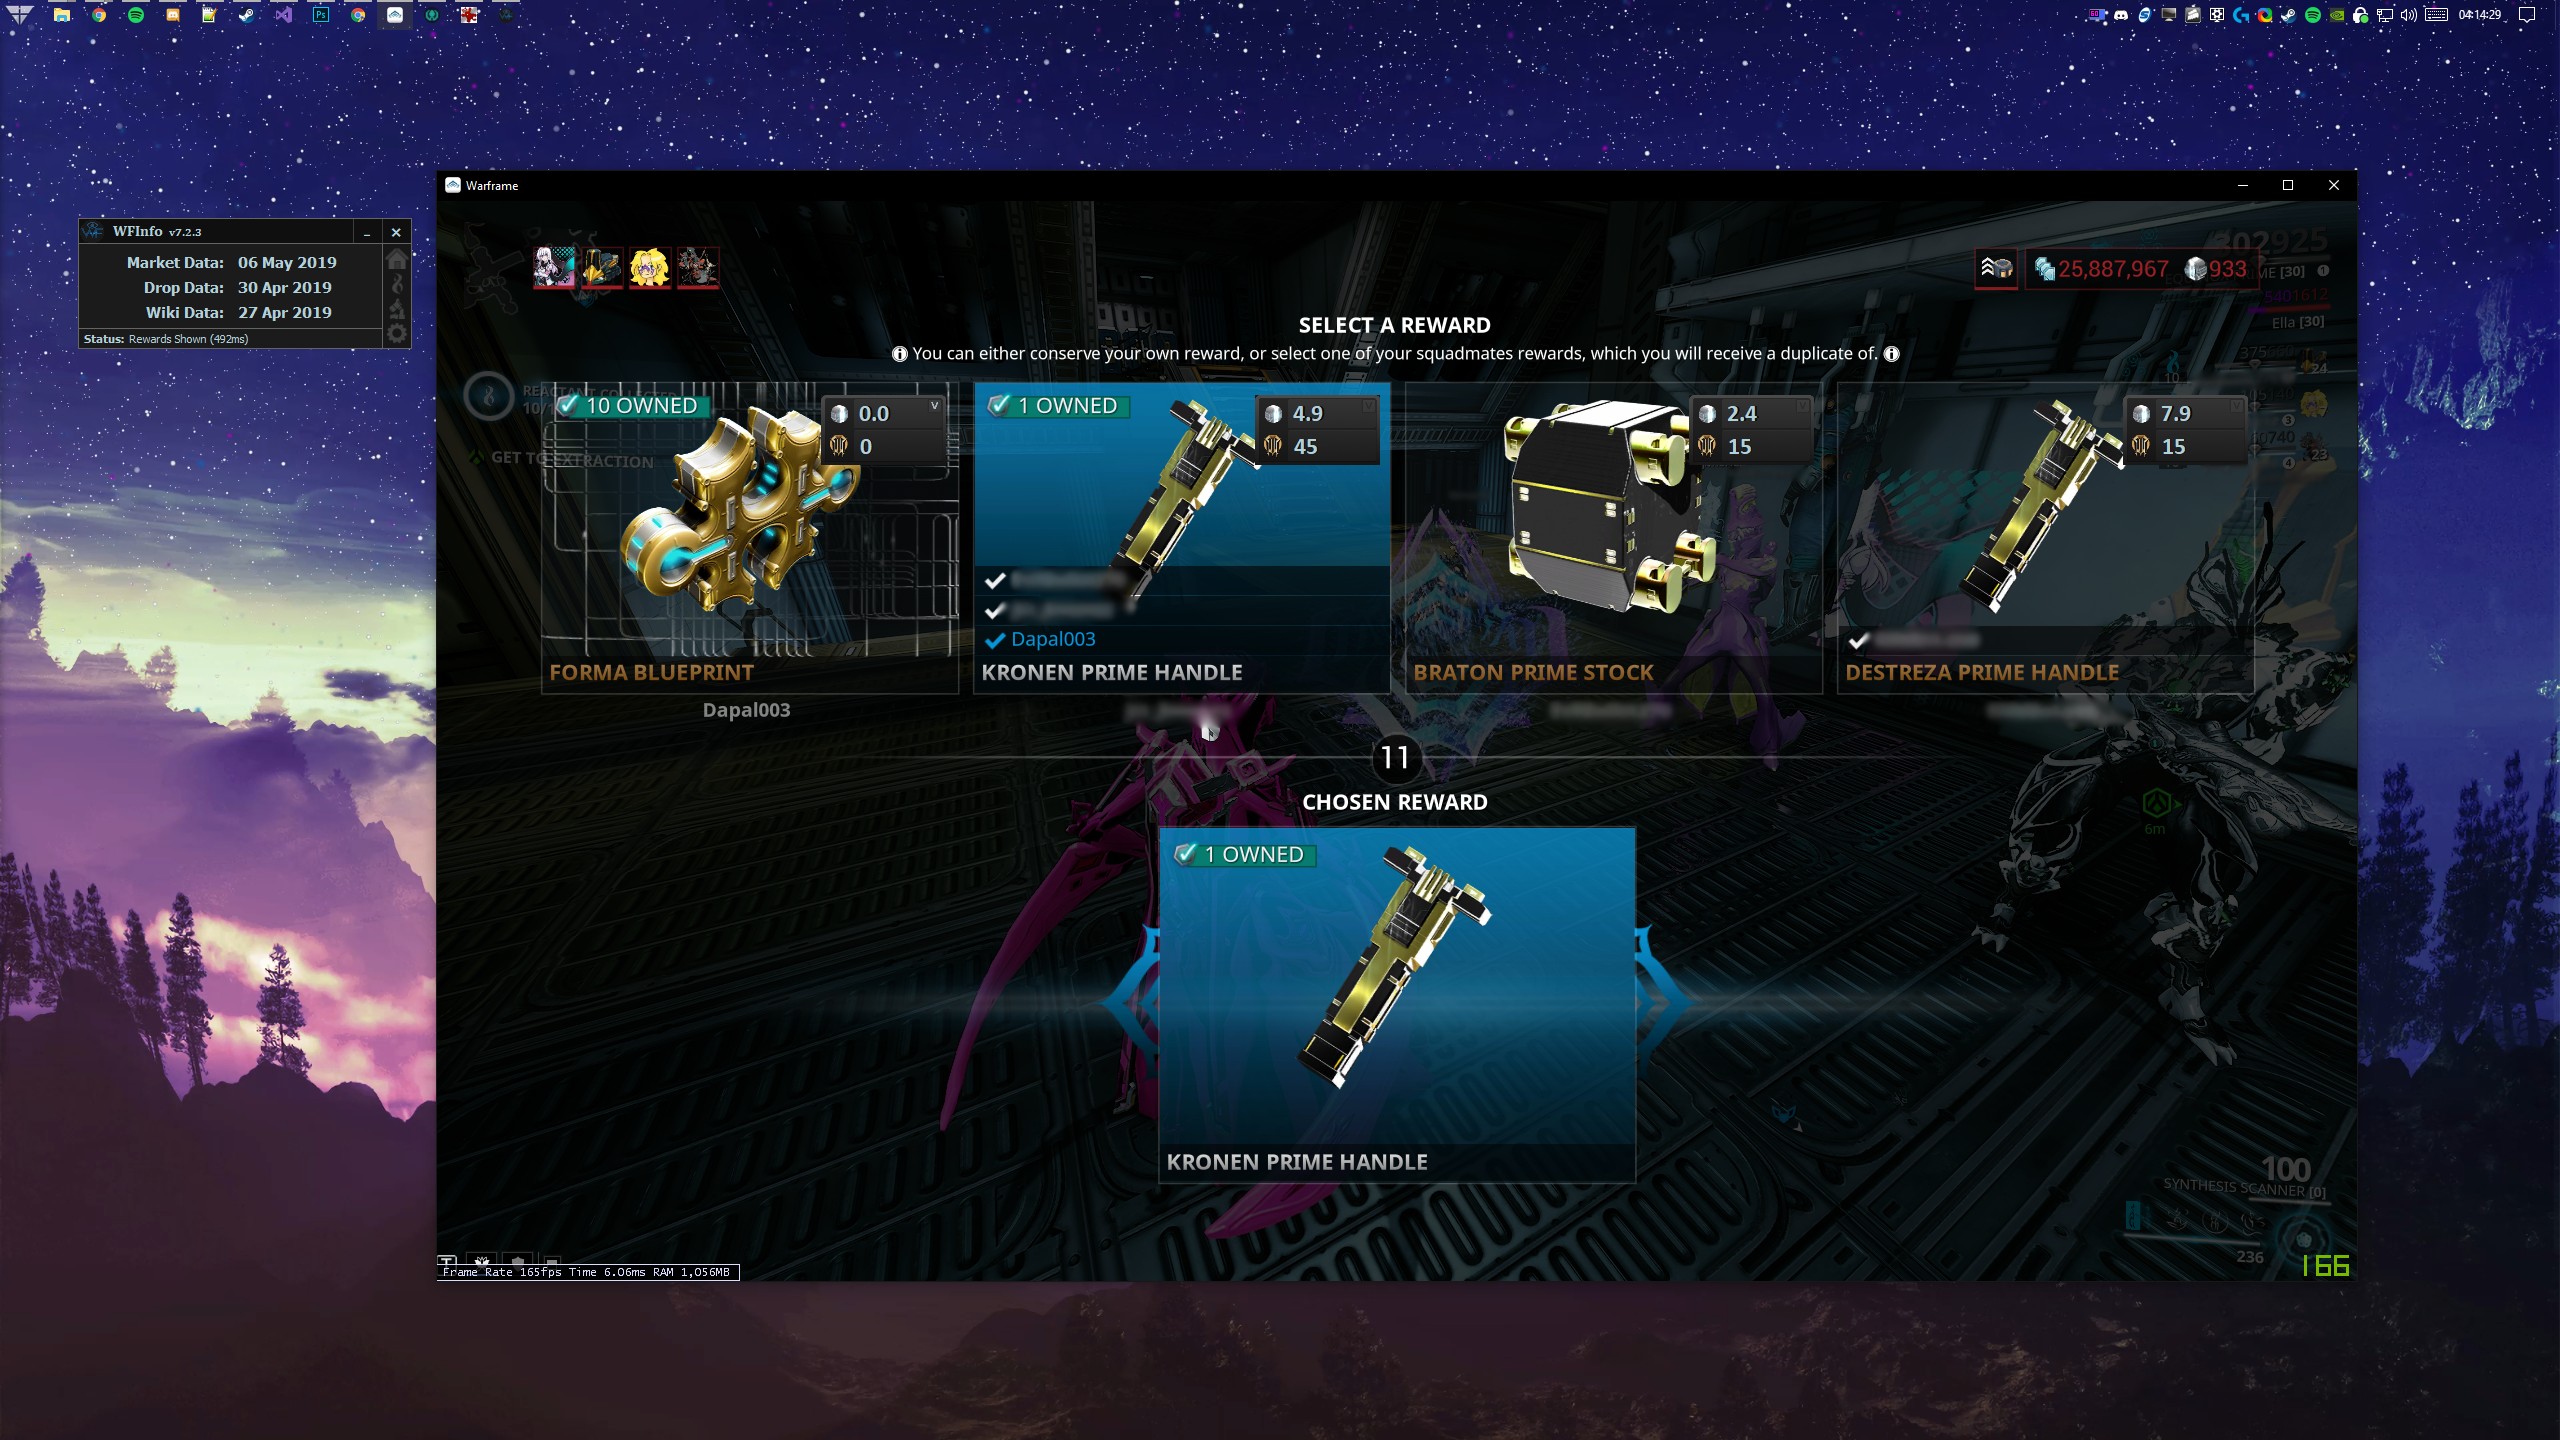
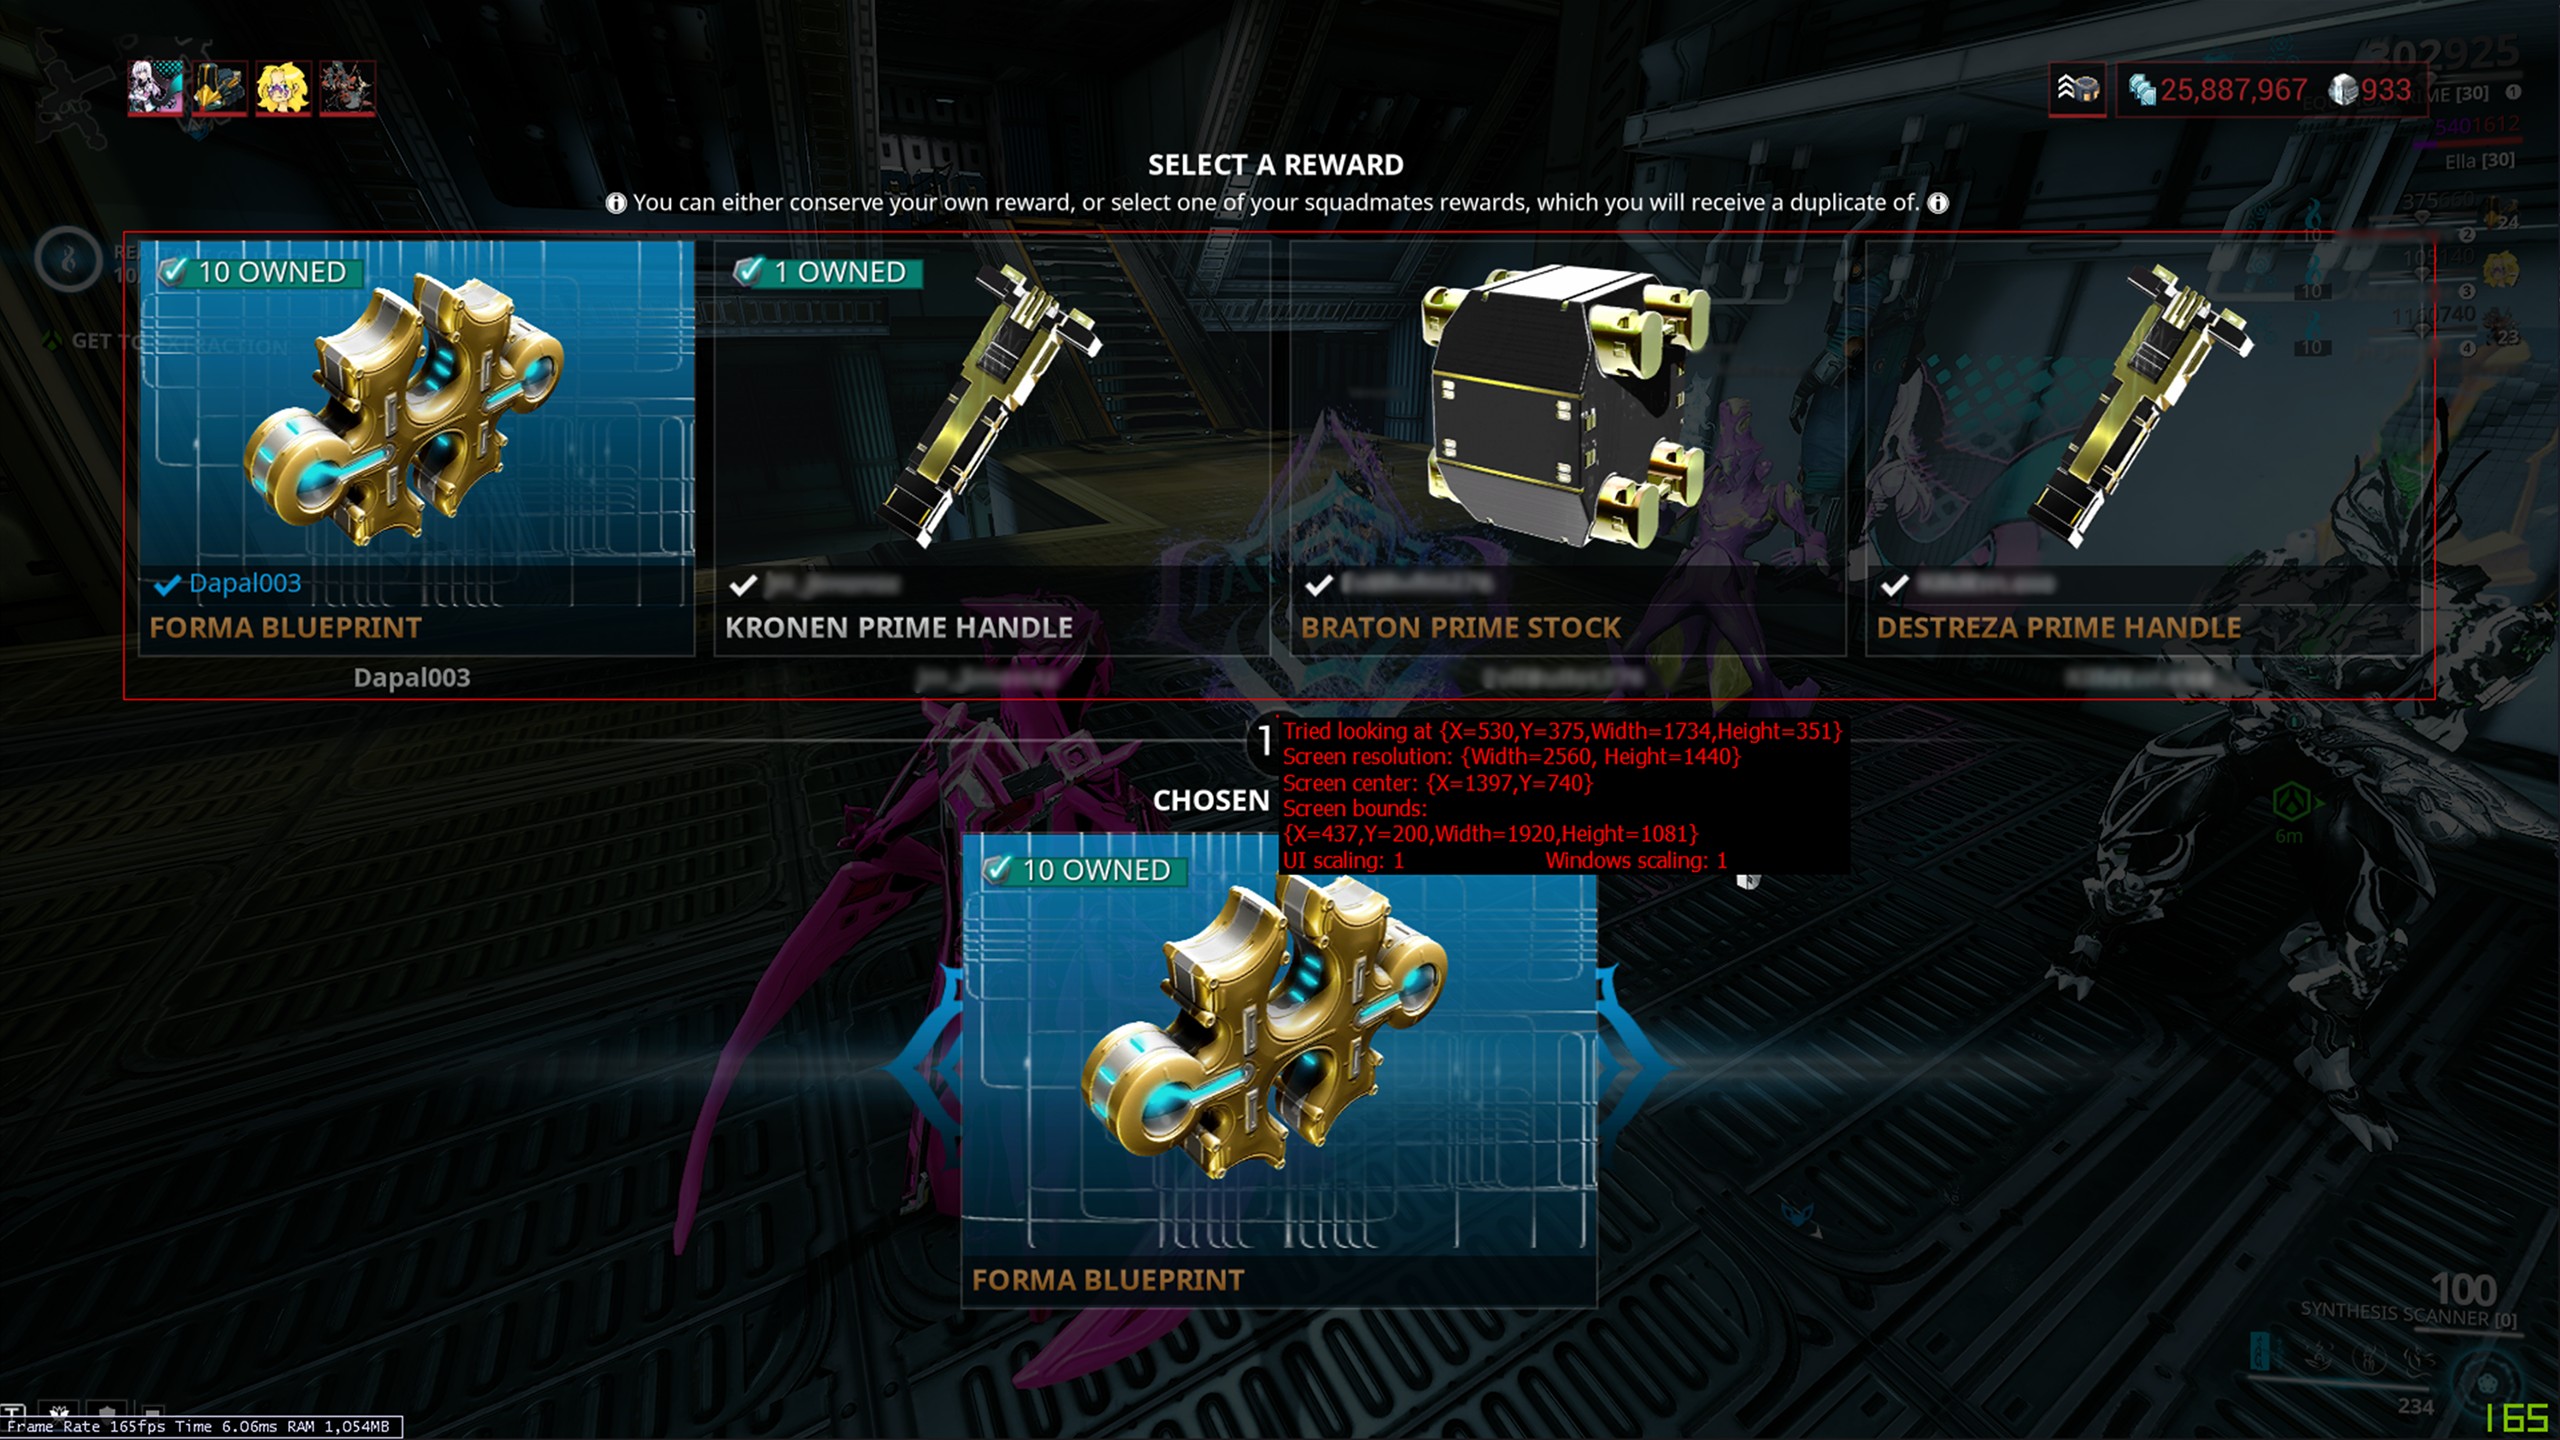
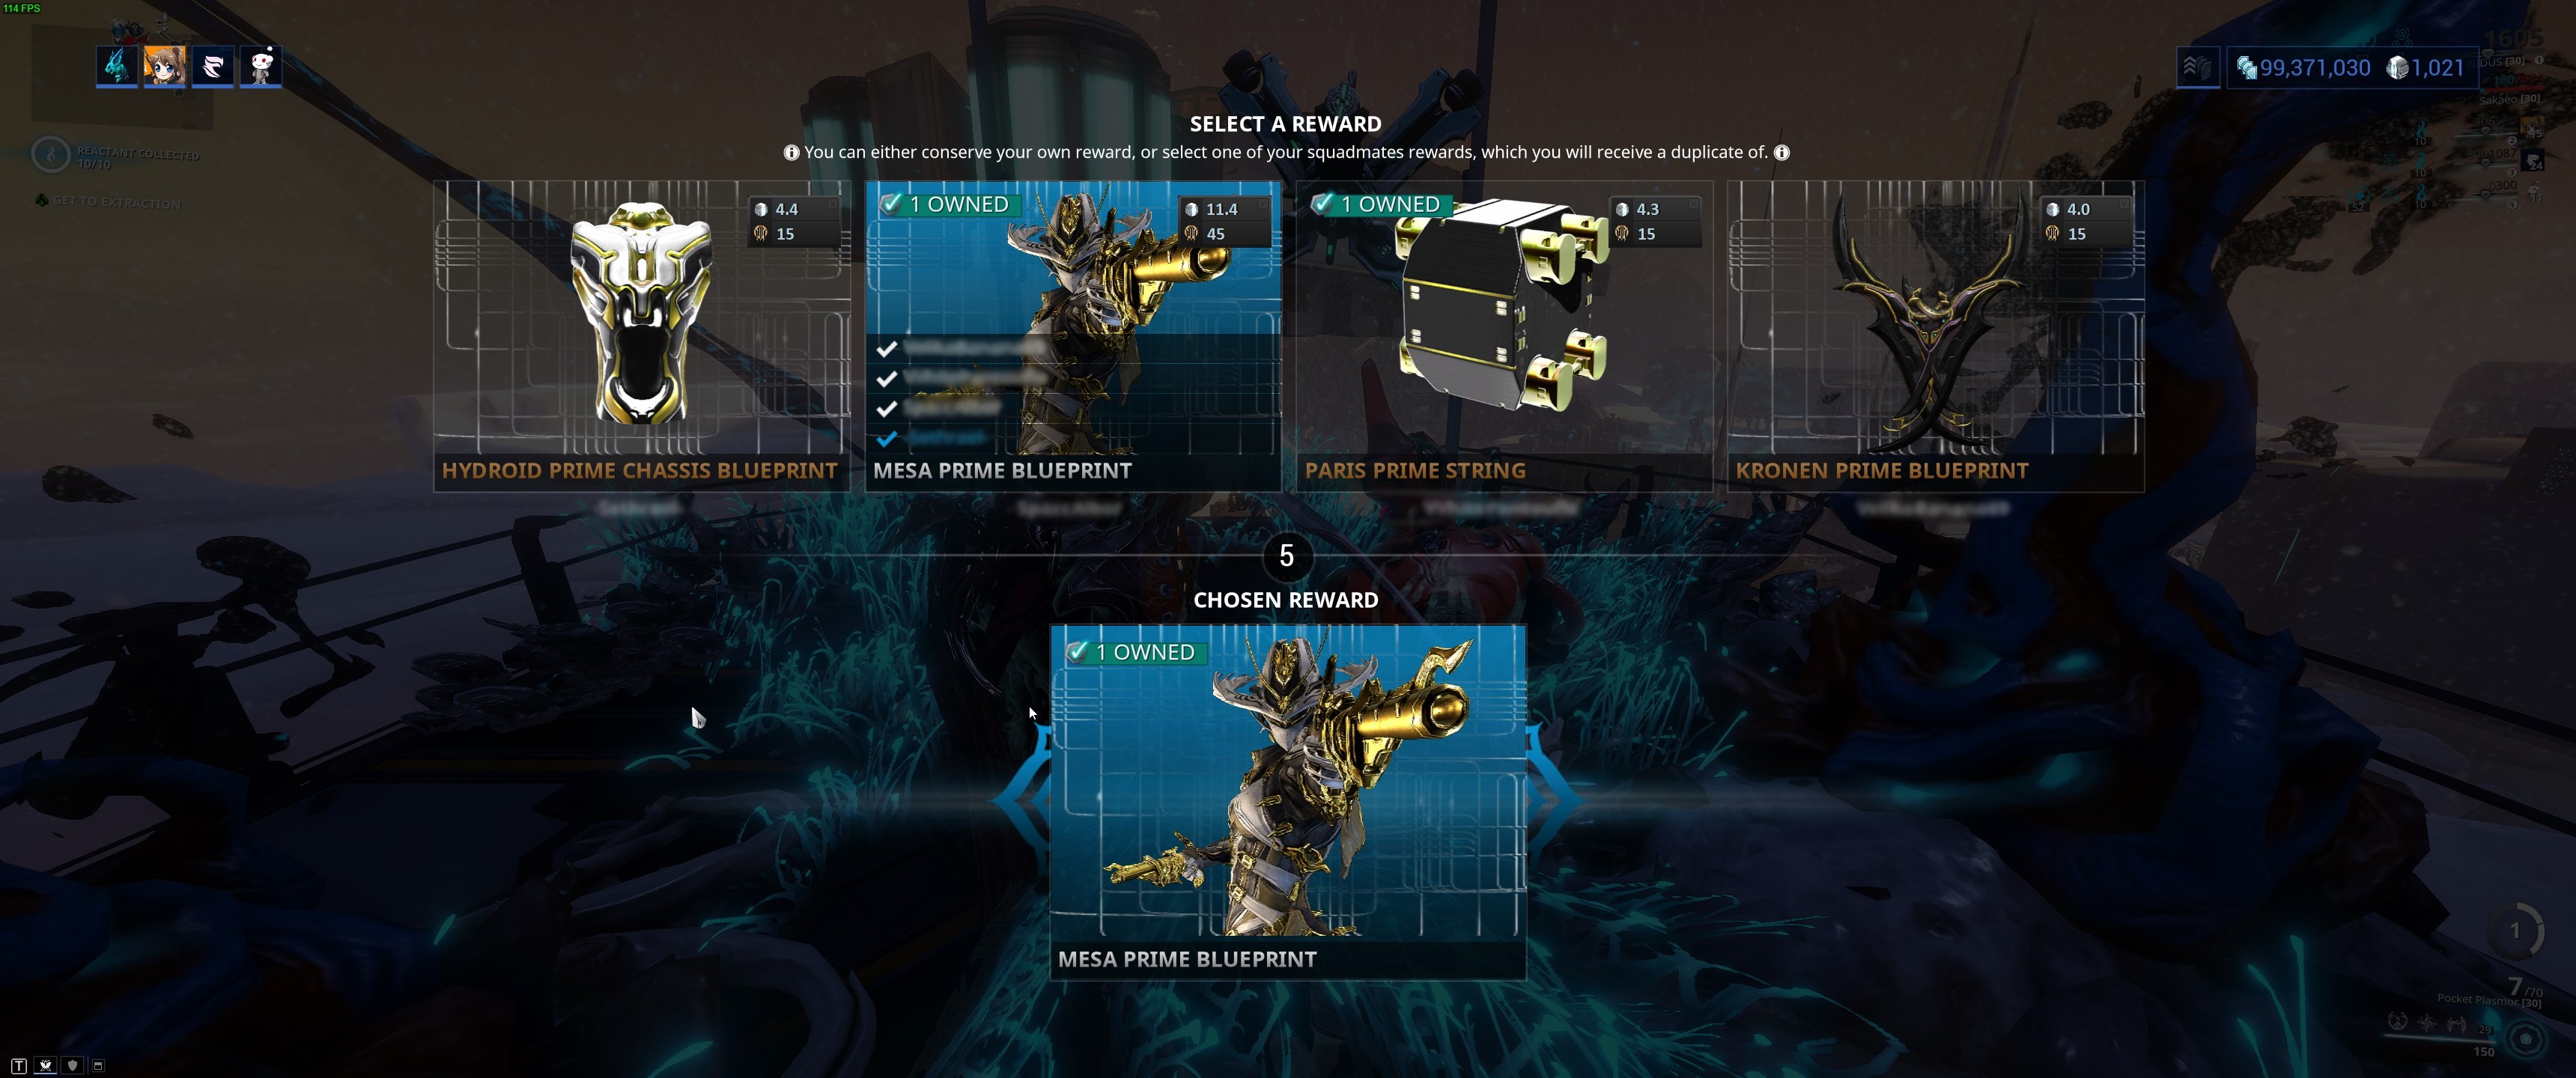
The default operating mode of WFInfo, activate with the hotkey (default: print screen) to scan the rewards at the end of a mission. A screenshot will be taken and the program will then read the reward names from there to display them.
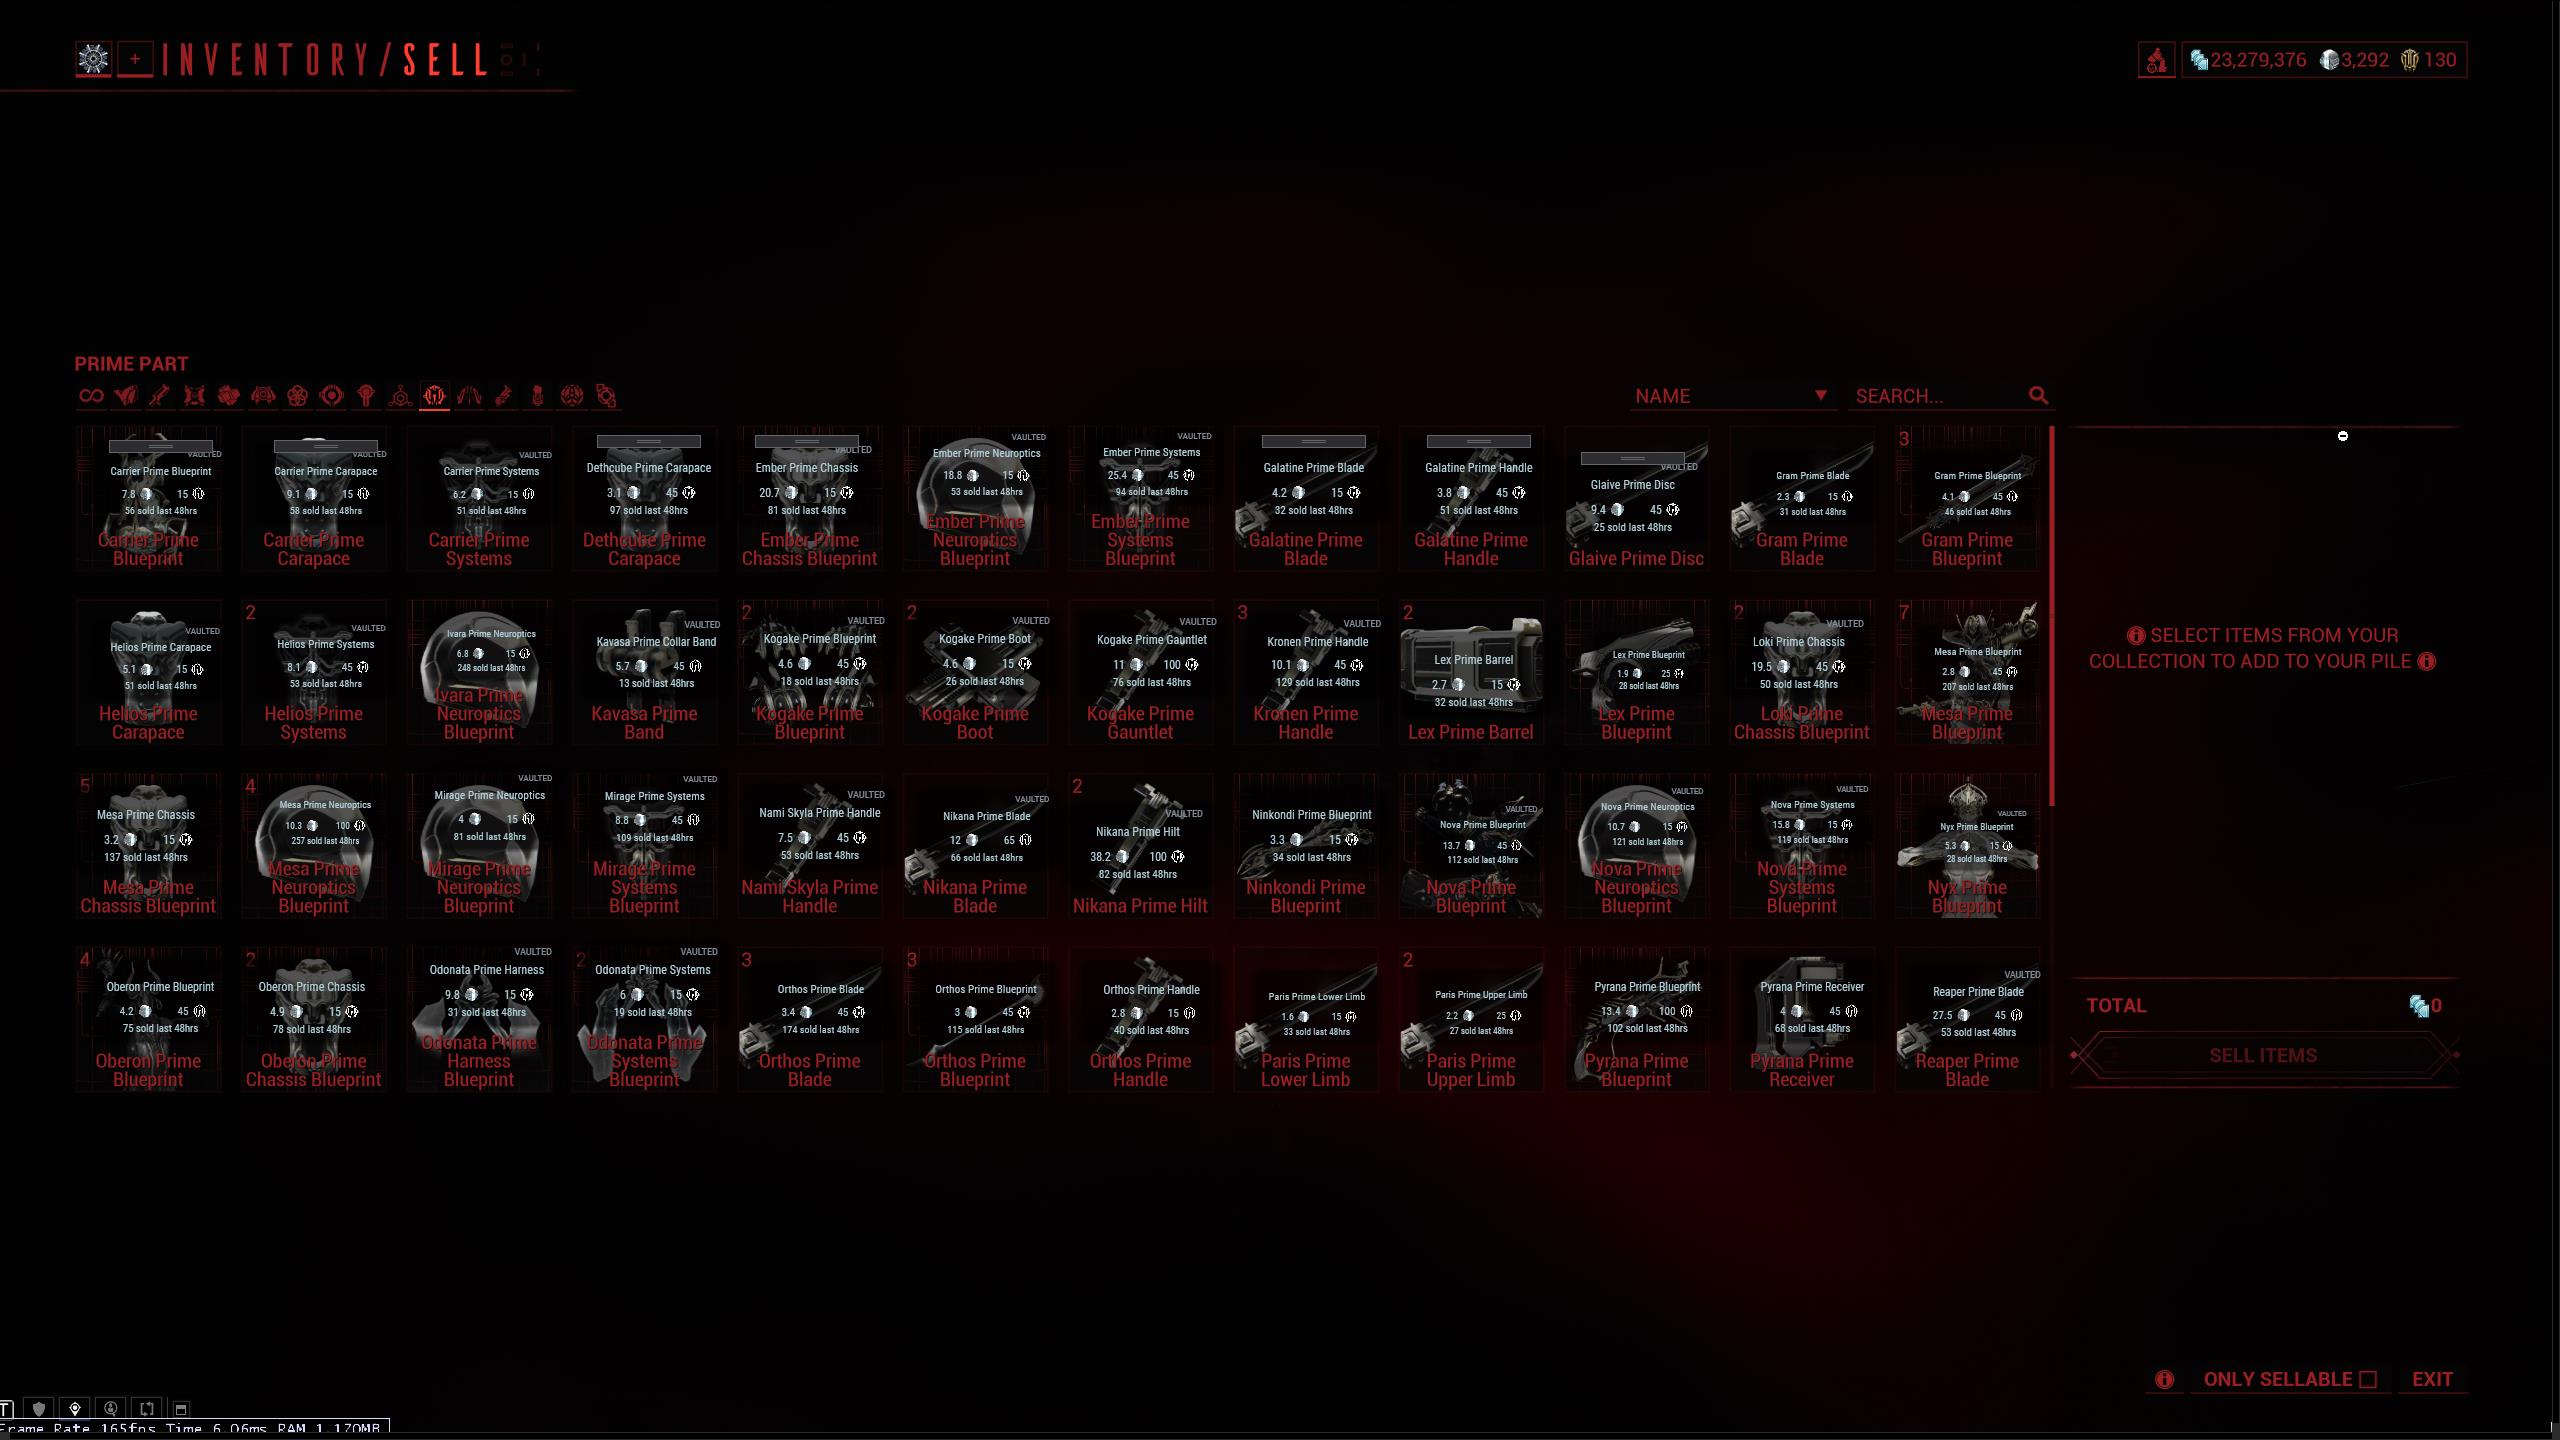
Snap-it brings the power of WFInfo to your inventory!
Hold the modification key (default: left CTRL) and then press the activation key (default: print screen) to start snap-it. Once started, a transparent overlay will appear.
Drag with your cursor to mark a rectangle containing the items you wish to scan. After processing, this will show an overlay the info about those items.
If you have the Count Item setting enabled, it will also try to scan the amount of each item and offer to let you save how many you own.
Snap-it requires Item labels enabled and does not work if the game is set to fullscreen, as there is no way to display over it.
Log into your warframe.market account and connect WFinfo to it. This will grant you the ability to do two things: Manage the statues you're displaying on the website inside of WFinfo and the ability to post sell listings from within WFinfo. You can create sell listings through a couple of ways, by playing a mission and getting prime rewards scanned WFinfo will remember these items for a while. Then once you open up listing window (the treasure chest) It will bring those rewards back up to prompt you to create an sell listing. If the item got mismatched you can change it. If you want to list an item without running a mission you can start search-it.
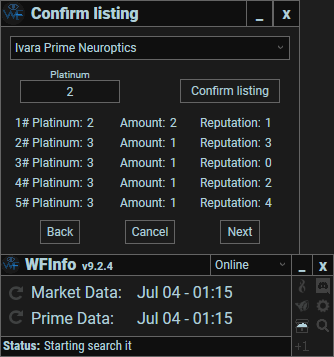
Search-it was originally a development tool used to quickly test the ability to create listings. But it was proven to be so handy it stayed. Spawn this menu by holding the modification key (default: tilde (`)), then pressing the activation key (default: print screen). A box will appear in which you can type any prime item part. It will then show the listing window where you can enter in a platinum value.
Master-it is a tool for telling WFInfo which prime items you have crafter or mastered in bulk. Open your profile screen, then activate it by holding the modification key (default: right CTRL) then pressing the activation key (default: print screen). This will check the screen for any prime items with mastery progress and mark them as such in the WFInfo inventory panel. This marking can also be manually toggled with the checkmark that appear on each item set.
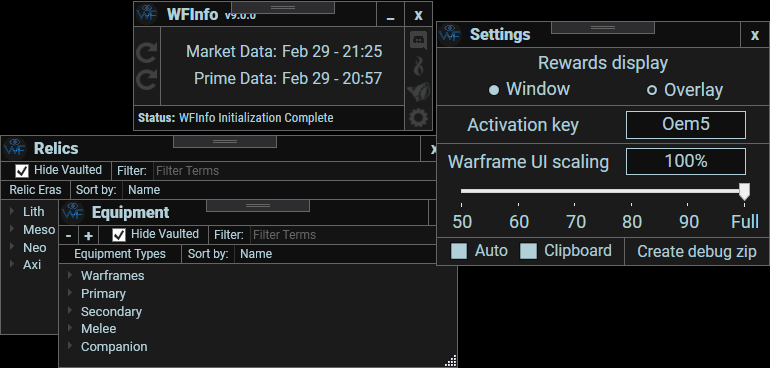
Settings
Configuring WFInfo so that it works correctly
- Overview
- Display mode
- Overlay options
- Snap-it options
- Activation hotkeys
- Snap-it efficiency
- Theme options
- Miscellaneous
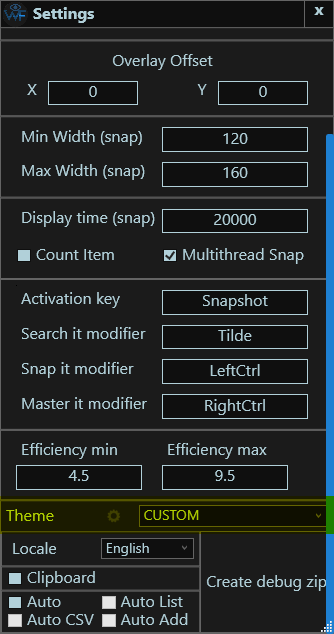
Settings menu is vertically resizable and scrollable, see individual sections for explanations.
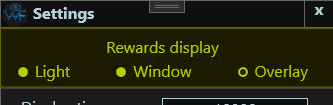
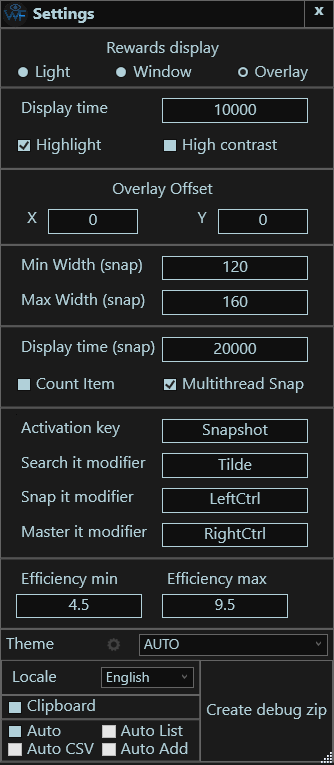
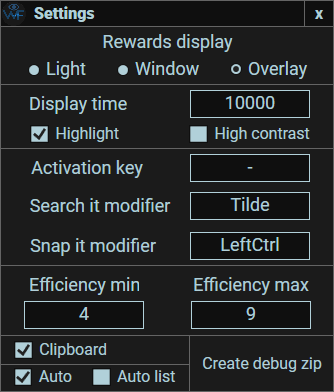
Choose between the rewards showing up as an overlay on top of Warframe, having a new window spawn displaying the items on a second screen, or light mode, having no display show up but copy to clipboard.
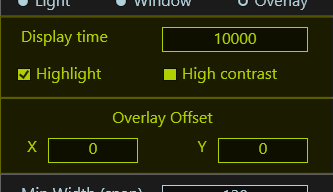
Change how long the overlay stays displayed. Change to high contrast mode to improve readability and change whether or not items get highlighted.
If display mode is set to Overlay, you can adjust where the result overlay appears.
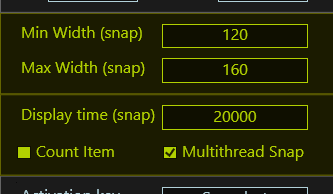
Choose the minimum and maximum allowed size for the snap-it results overlay. Change how long the snap-it results stay displayed for.
Change if you want snap-it to attempt to detect how many of each item you have, and let WFInfo remember that.
Choose if snap-it is allowed to use more of your CPU at once for faster results.
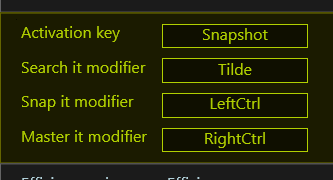
Choose your preferred hotkey to activate WFInfo's reward detection. We recommend printscreen by default but you can use almost any keyboard key and even some mouse buttons!
Avoid setting your activation key you'd frequently press for other reasons.
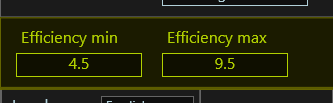
Snap-it efficiency, these are ducats per plat values. Anything under the min value will display as red and anything above the max value will display as green.

Useful in cases where you have issues with theme detection or the standard theme presets.
Use dropdown menu to override the automatic theme detection. In most cases, this should be left on AUTO
Use the cog (settings icon) to modify the CUSTOM theme option, if the standard options are insufficent
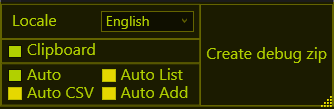
Auto will use the logs created by Warframe to detect when the reward screen is being displayed and run the program for you!
Clipboard will copy the results into your clipboard allowing you to paste it into the chat for other players (Ctrl + V)
Auto List will only work with Auto enabled, it wil spawn a listing screen whenever it detected rewards and an end of mission
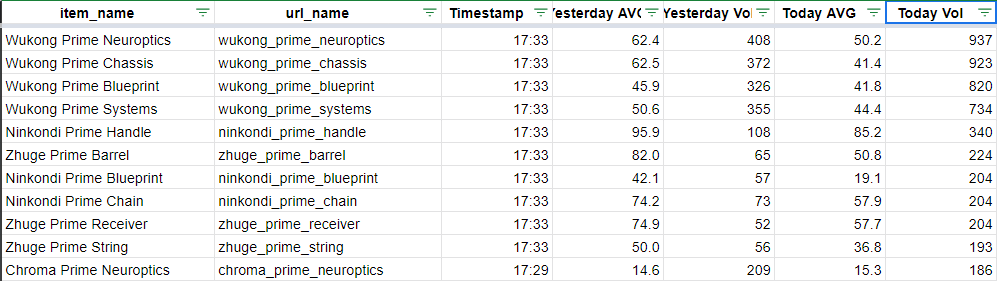
Auto CSV will only work with Auto enabled, it will record information about your reward choice in %appdata%/WFInfo/rewardExport.csv
Auto Add will only work with Auto enabled, whenever it detected rewards and an end of mission, it will open an interface for increasing how many of the chosen reward you own according to WFInfo.
See Count Item feature found under Snap-it options
If you ever run into a problem running WFinfo then you might be asked by the developers for a "Debug zip", this contains information useful to the developers for debugging what went wrong.
This button will generate a series of zip files that can be sent over discord (All are under 8mb)
Theme Adjuster guide
Configuring WFInfo to work together with Colorblind mode and any other color-changing effects.
Open by pressing the cog in the Theme section within the Settings menu
- Overview
- Loading a test image
- Enabling and testing a filter
- Adjusting a filter: Part 1
- Adjusting a filter: Part 2
- Adjusting a filter: Part 3
- Adjusting a filter: Part 4
- Using your custom theme filter
- Sharing and importing
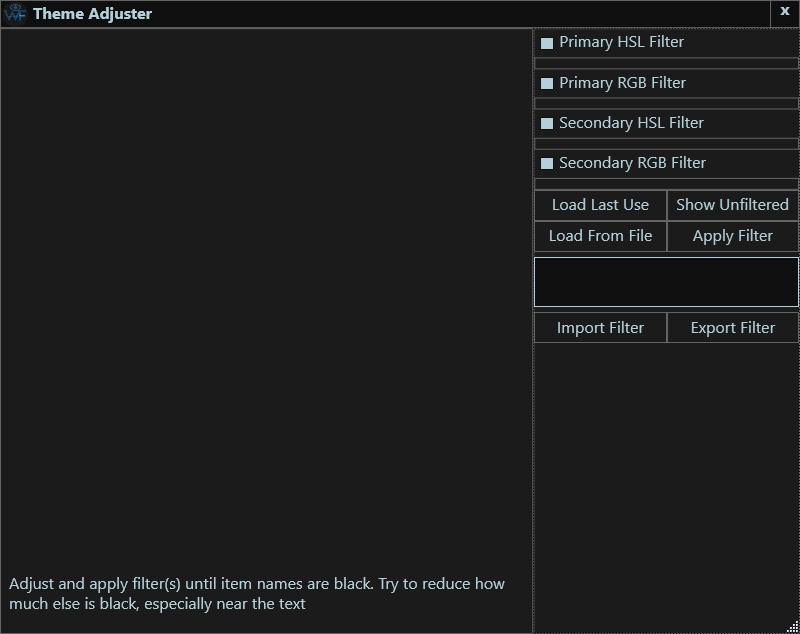
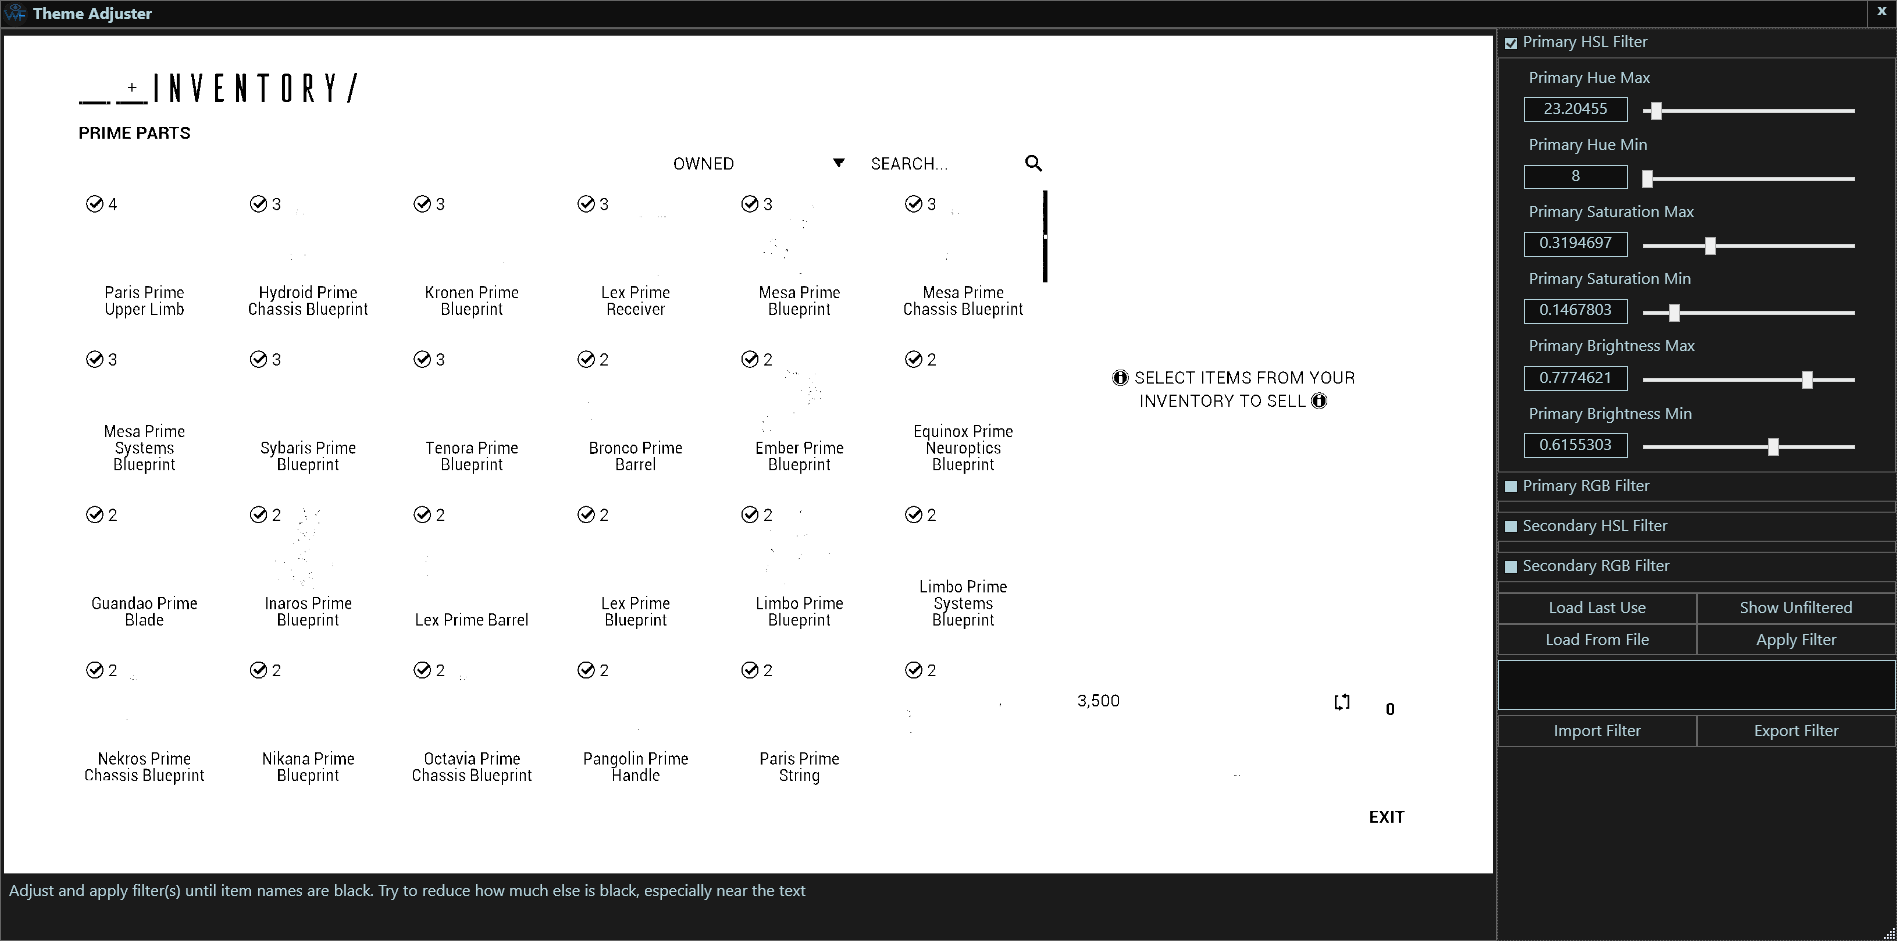
The left side of this window is used for viewing the results of your custom theme filter
The right side contains everything for controlling this menu and your custom theme filter
What each button does will be explained in the later steps
To configure a theme properly, we need an image to test it on.
If you have recently tried using the reward screen scanning or snap-it feature, click Load Last Use to use it for testing.
If you want to use some other image instead, click Load From File and select which image you want to use.
After using one of these buttons, the image will display on the left
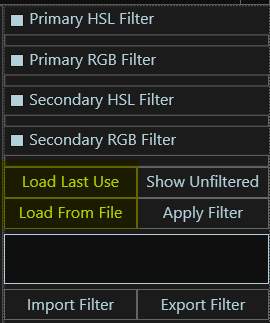
There are 4 filters in total, two that use RGB for describing colours and two that use HSL.
To start off with, select one of these filters and click the checkbox to enable it. Which one you select isn't important
RGB and HSL describe colours in different ways, which could affect how good of a filter you can make. If you can't get a good enough result with one, you should try using the other
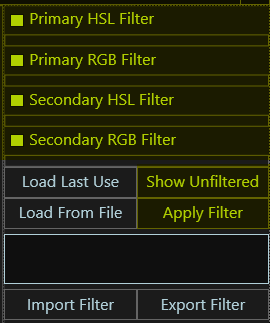
Show Unfiltered> can be pressed at any time to show your original test image
Apply Filter can be pressed to apply the active filters. A pixel will be black if it was within the assigned range for all parameters for at least one of the enabled filters, otherwise it will be white
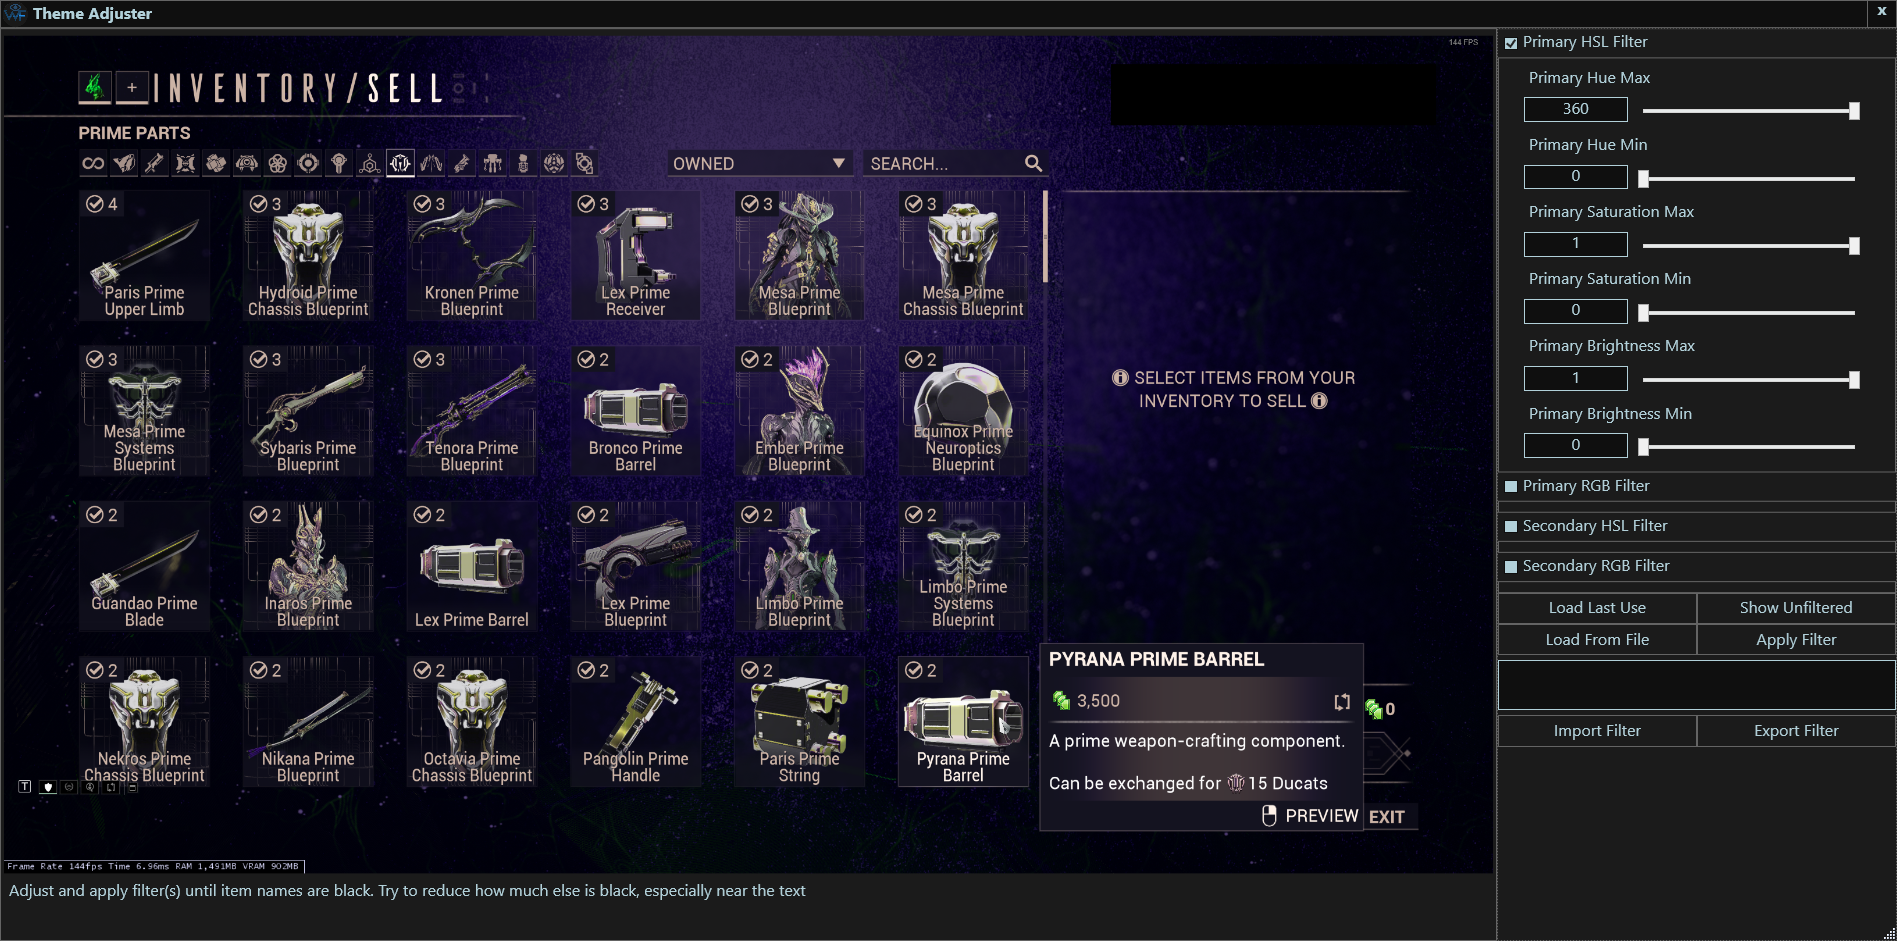
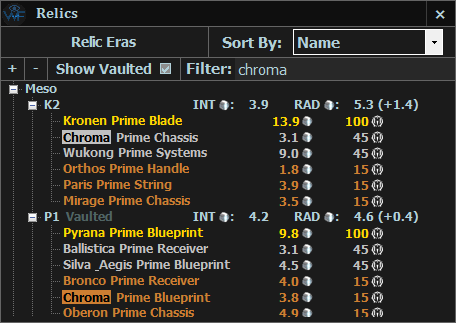
Here, I picked Primary HSL Filter and have resized the window to better see what the filter will be doing. The image in this example is using the Vitruvian theme with Tritanopia colorblind compensation
I am now going to do the following:
1. Adjust one of the sliders, in this example I will be changing Primary Hue Max to about half. You can also write a number in the corresponding textbox, using . for decimals
2. Click Apply Filter
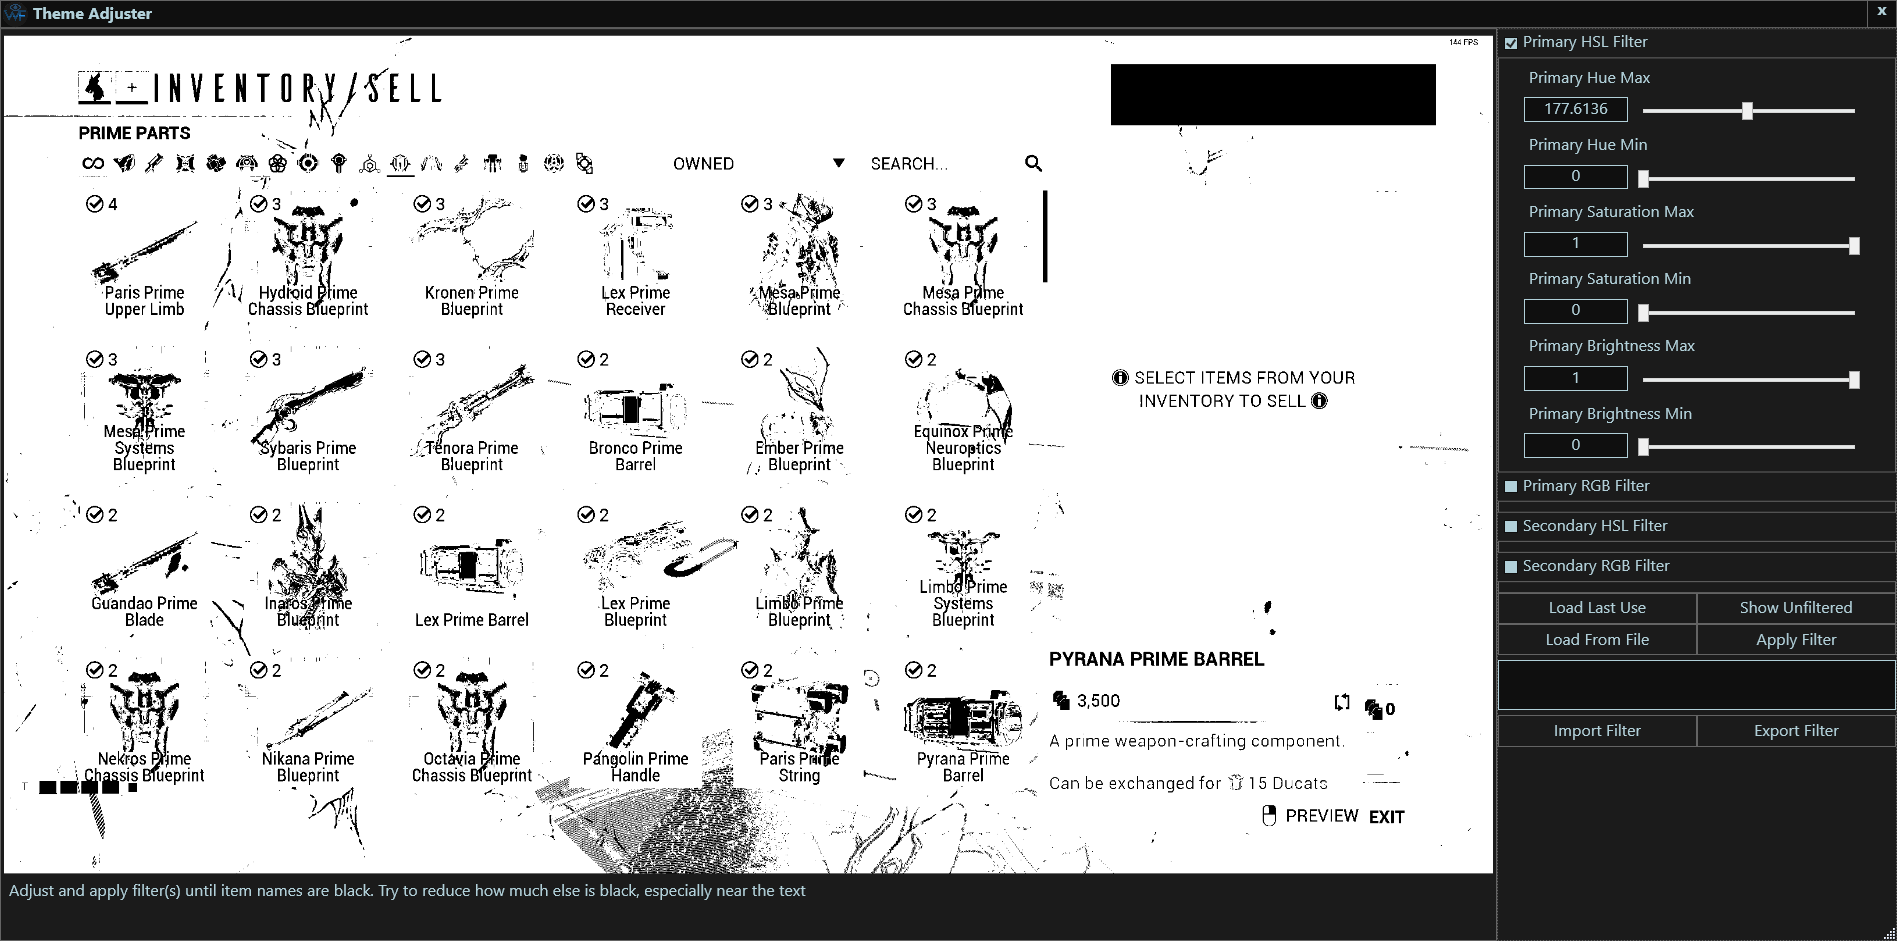
As we can see, the text is still black in this image, but so is a lot of other things. For you, the entire image may be black!
We will now repeat this process, trying to find when the text switches from black to white
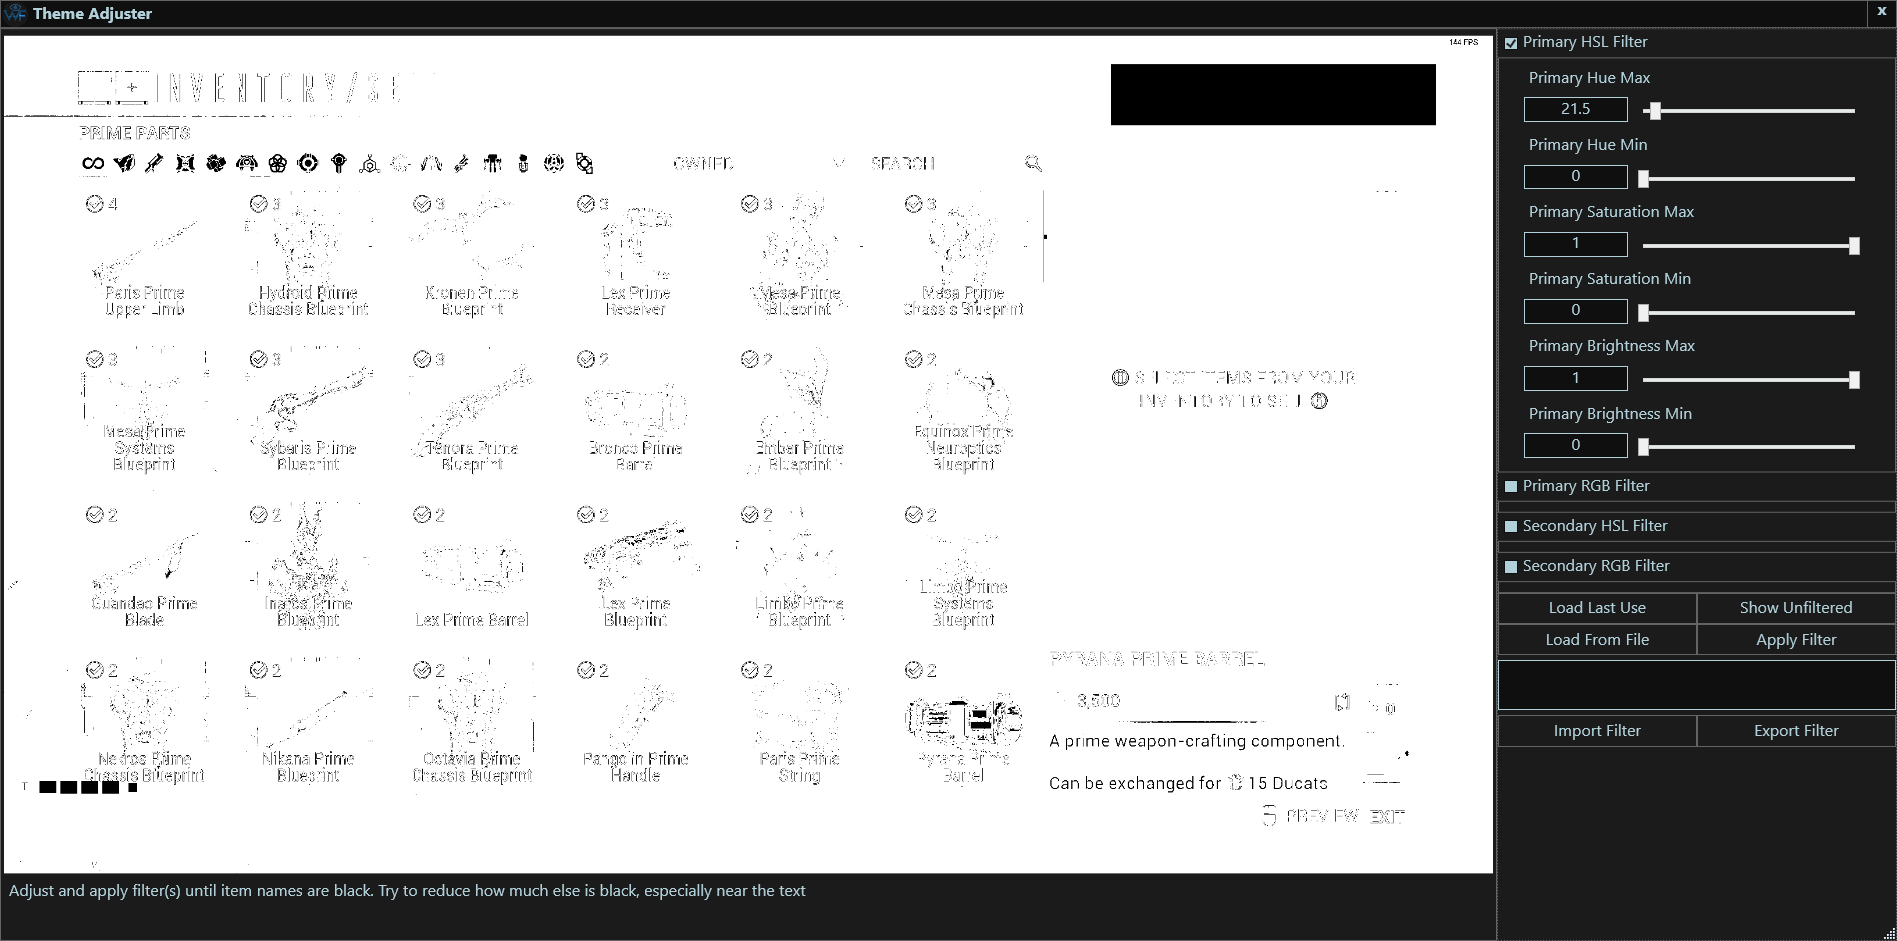
After adjusting and applying the filter a few times, this time the text turned white!
I know I'm close to the correct value for what I'm adjusting right now, so I'll adjust it just a bit more and it should be perfect!
There we go! Time to repeat the process for each of the other sliders. Don't forget that the min value should always be lower than its corresponding max value
You may notice the text for Pyrana Prime Barrel in the bottom-right corner is still white. We'll cover that later
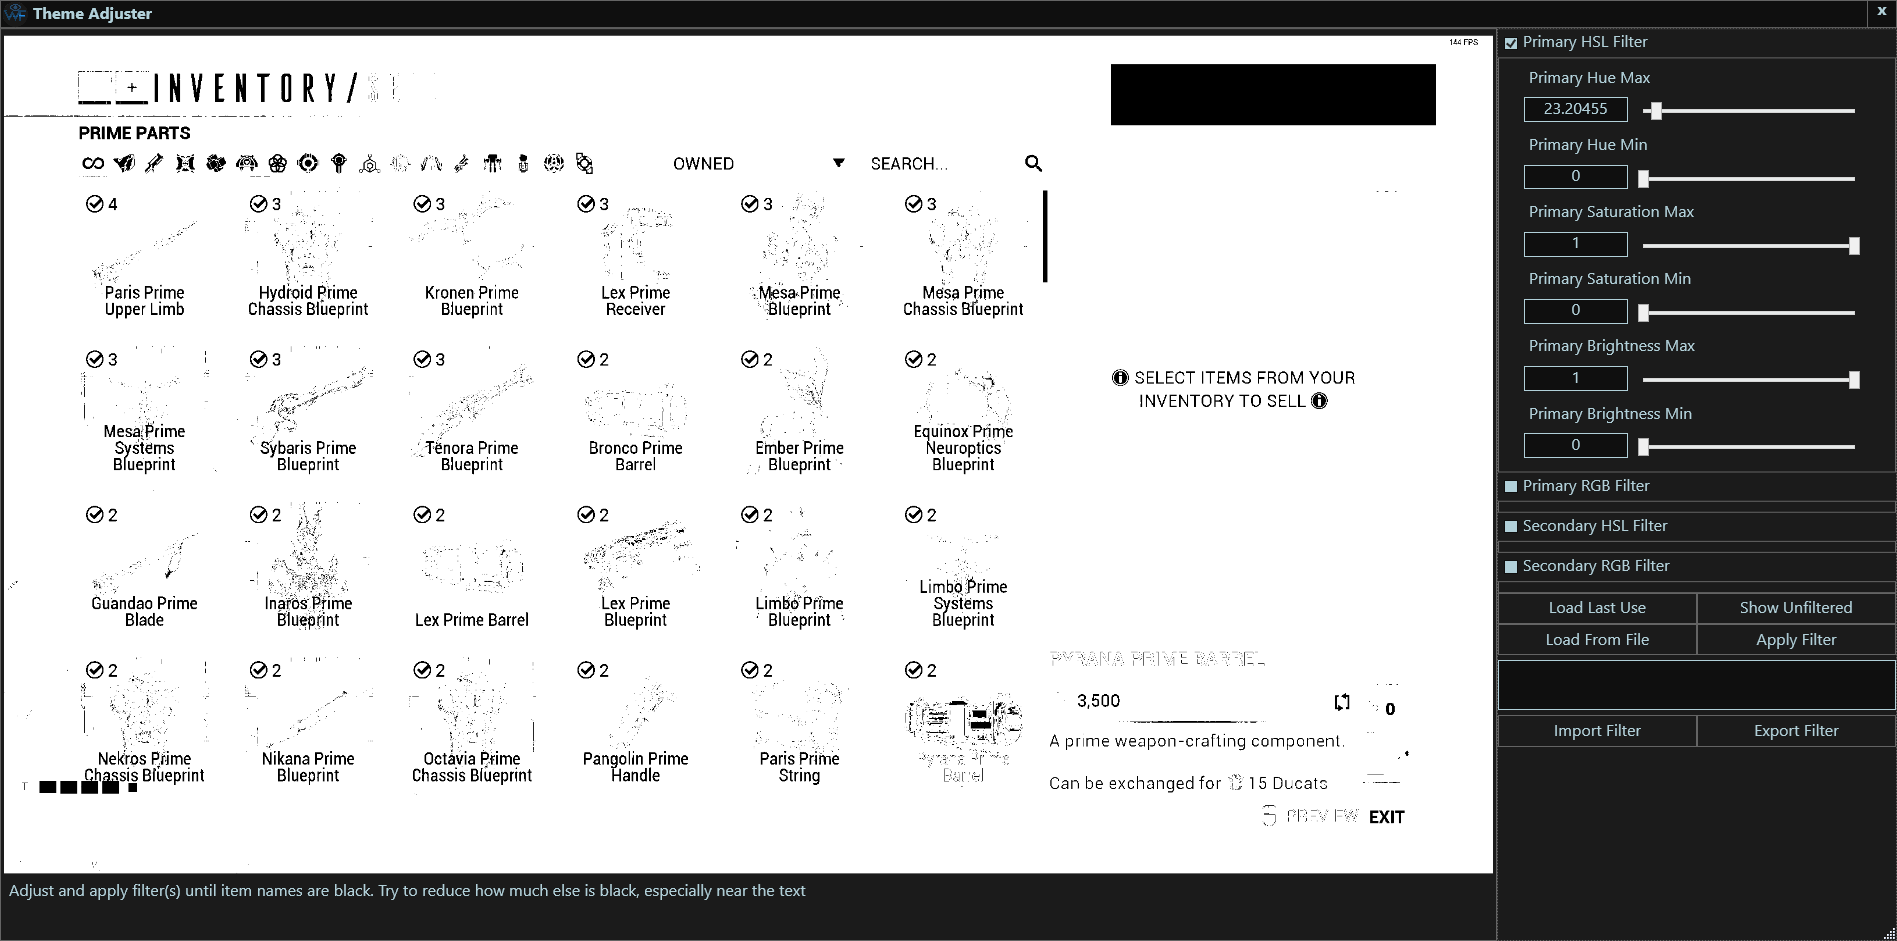
After adjusting all the other values, and this filter turned out very well.
However, the Pyrana Prime Barrel in the bottom-right corner isn't visible. Why is that?
In the original image, I was hovering over the Pyrana Prime Barrel. The game uses a different color for this, so we'll need to use a second filter.
To do this, simply enable another one of the filter options and repeat the adjustment steps, this time focusing on just the text for the hovered item.
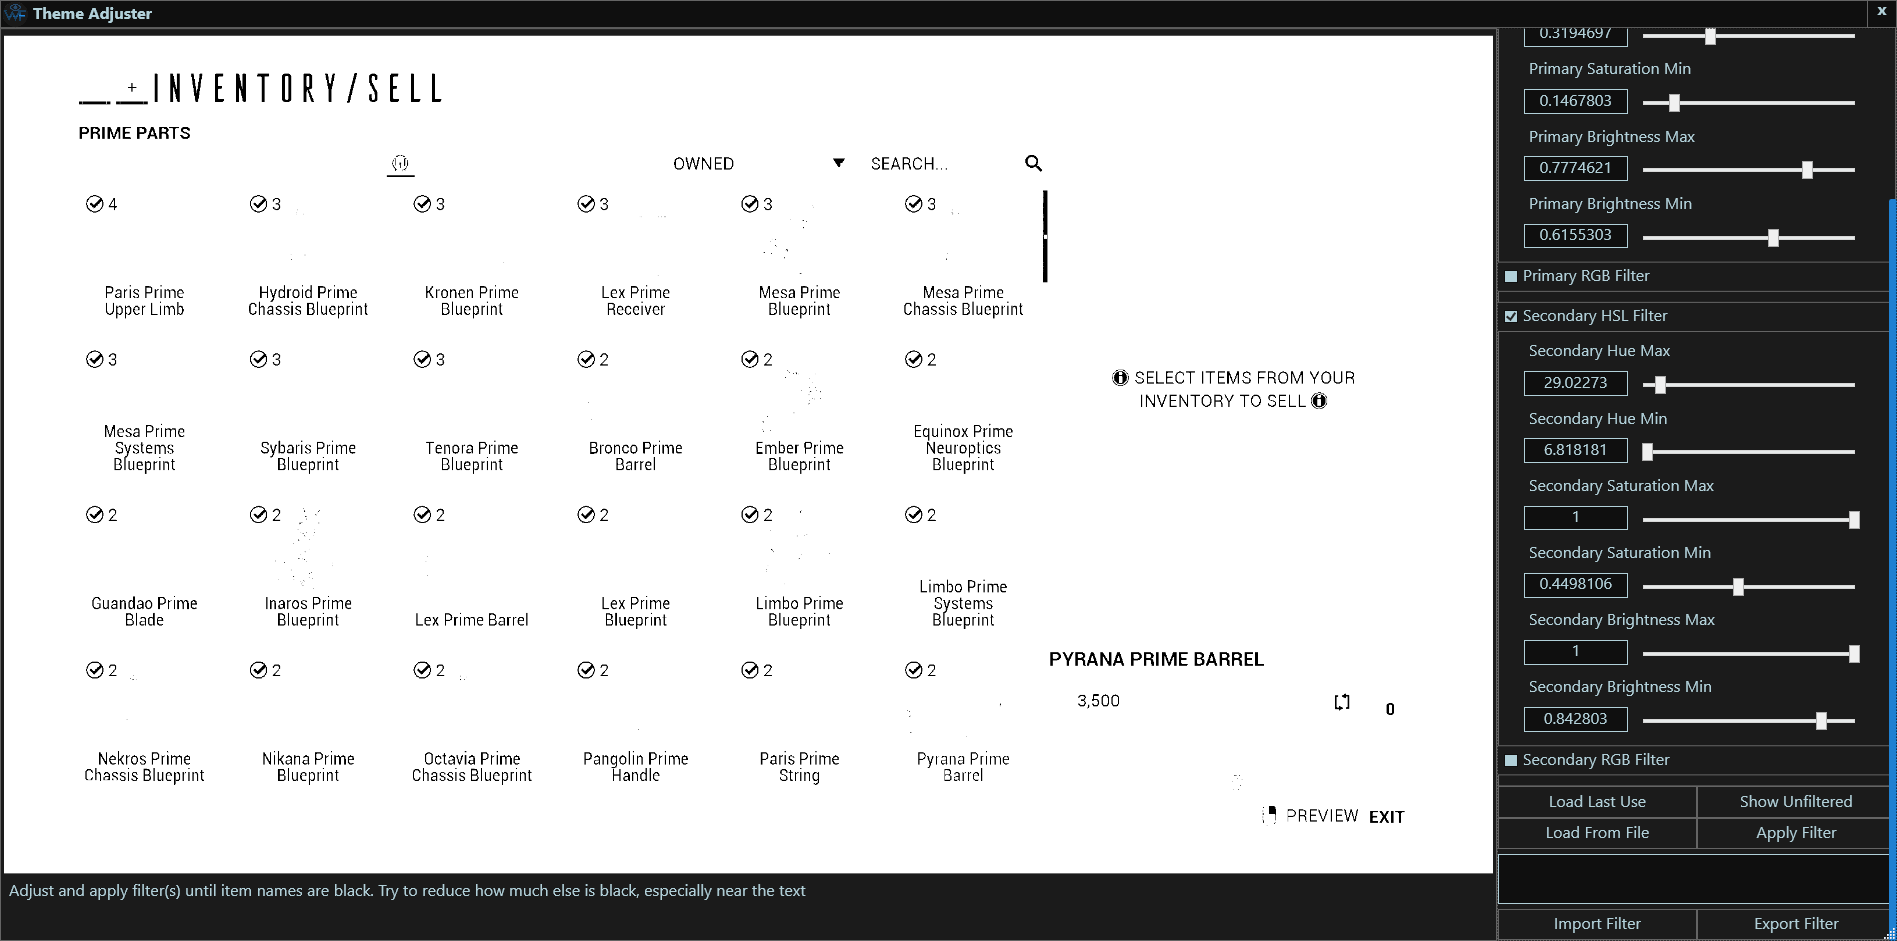
Now this filter is complete, and ready for use!
This example turned out really well. Even if you get a lot more noise than this, it can still be enough for WFInfo to work well.
Once you're done adjusting your custom filter, simply select CUSTOM in the Theme section of the settings menu
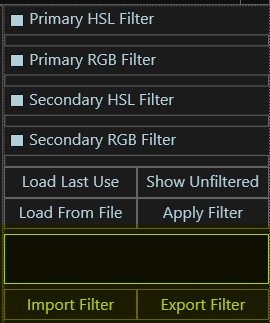
To share your newly customized filter with someone, click Export Filter.
The exported filter will appear in the text box above the buttons.
To import a filter, clear the textbox above the buttons, paste the filter into the text box above the button and click Import Filter
Importing a filter will delete your old filter
FAQ
-
Use at own risk? What are the risks?
WFinfo takes screenshots in order to process the data from Warframe. This means that
everything on your private monitor will be captured when the process is triggered.
These are saved in screenshots which remain locally on your machine for 12 hours.
Developers in the discord server might ask for a "Debug zip", these zips contain the screenshots taken.
Please make sure to only share this with developers, and always first check the contents!
If you wish to contact developers without discord please reach out to [email protected] -
Does this inject anything into Warframe? / Can this get me banned?
No, and no.
[DE] Aidan has confirmed it Here. -
What do I need for this program to run?
The recommended OS is Windows 10 with at least update 1903, this will include the correct .NET packages needed. Along side that it's best to run the game at 1080p or a higher resolution for best results. -
Why is it showing wrong rewards (for snap-it)?
The program is not perfect, however, there are steps you can take to improve the results. The most impactful one is to increase resolution, either by increasing the game resolution or by increasing menu scaling. Another way to increasing performance is to change your theme to one with higher contrast, the default Vitruvian works well. -
Will this work with multiple monitors? / Will this work with 21:9?
Yes. - Why am I getting incorrect prices or the wrong number of popups? It's possible that the text recognition failed so make sure you've set the scaling correctly, if the issue persists please contact us on discord.
-
Is this safe to use?
This software is Open-Source so if you're concerned you can have a look at the code. -
How do I use warframe.market inside of warframe info?

In order to create a listing you first need to log into warframe.market. You need to have a dedicated password for this. If you use another login method (i.e. steam/xbox ect.) you will need to add an email to your account. You can do that under settings -> account Enabling "Remember me" will save an authentication token in your system registry. No email or passwords are saved!

By running a fissure mission wfinfo will store the results from the rewardscreen until you activate it by clicking the chest icon or having auto list triger. A dialog with the top 5 current sellers is listed, allowing you to make an informed decision on price. It is also possible to spawn this screen without running missions, helpful if you're listing from your inventory! Clicking the search icon or combining the search it keybinding with the hotkey will spawn a search box. Type in any prime item and hit enter. A similar dialog will spawn but with only the item you searched.
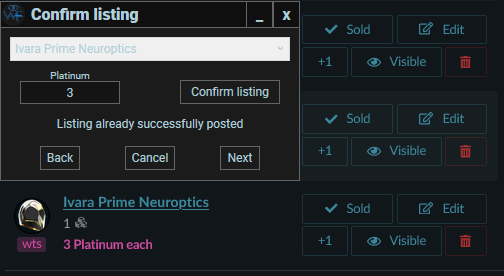
If you already had an active listing for the item it will be updated to the new price and one will be added to the quantity.
WFInfo change log
What was added in the latest releases?
9.6.0
Improve performance of searching equipment window
Show set price on overlay
Added Auto-CSV and Auto-Add
Detect game close and reopen
Added limited GeForce Now support
Added option to override theme detection
Added Theme Adjuster, allowing support for color changes such as Colorblind mode
Improved experience when snap-it results may be unreliable
9.5.6
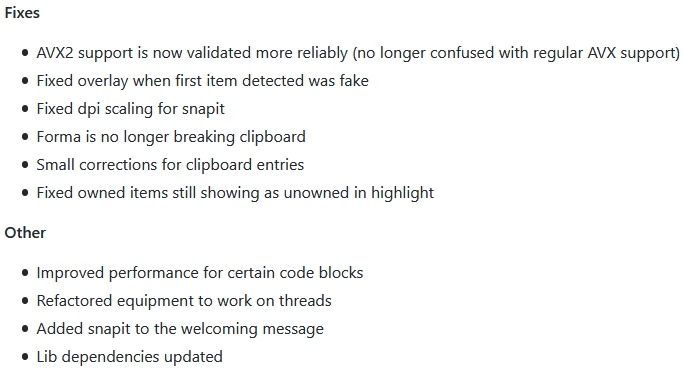
Fix Master-it, was broken due to in-game UI changes
Fix extra WFM listings being created instead of existing ones updating
Allow snap-it listing size to be adjusted, Improve reliability of Count Item
Fix detection of already-running WFInfo instances on startup
9.5.5
Fix Count Item, was broken due to in-game UI changes
Separate display time setting for snap-it
Improved stability of WFM login sessions
9.5.4
Improve behaviour when new items get added to WFM
Temporarily disabled Count Item due to in-game UI changes
9.5.3
Switched item/price data distribution to WFCD / warframestat.us API
Proxy support, reduce log spam from WFM activity
9.5.2
Fix rare crash from scrolling in Relics/Equipment menu
9.5.1
Make AVX2 detection work properly on 64-bit systems.
Fix minor logging bug
9.5.0
Revamp of code for various parts of the UI, modernize project files to work with Visual Studio 2022
Added multithreading to Snap-it
Various improvements and fixes to existing functionality
9.4.2
Added Mastered status marking
Added Master-it
9.4.1
Added snap-it to equipment scanning
Fixed fullscreen reminder not spawning
9.4.0
Added korean language support
Added fullscreen reminder
9.3.1
Fixed status getting changed rapidly
Fixed high dpi not properly getting rewads
9.3.0
Warframe.market integration, allowing you to make listings
Allowed more settings to be tweaked in app.
9.2.2

It's now possible to enable reward highlighting. It will show which items have the best plat and ducat values as well as items not yet marked as owned.
General stability and preformance updates
9.2.0
Introducing multi snap-it! You can scan more than just a single item now, drag a rectangle over your whole inventory and see how much everything is worth.

We've introduced an automatic scaling detection. For the users who like to play around with their scaling. This will take any menu scaling and still perfectly read the rewards out from it!
9.1.0

Snap-it. Activate by pressing ctrl + hotkey and drag a rectangle over the item you want to see the price of. An overlay will spawn and show you what the item's value is!

Changes to how we update our program, boosting smaller and faster download speeds. Along side that general responsiveness has been increased, making the whole application more snappy.
9.0.0
Refactored entire code base to be now on C#, this will mean more people can contribute easier.

A whole lot has been added, just to list a few: Improved auto to work much more reliable, Improved detection overall. On 1080p we're receiving 99.9% accuracy and for 720p its 90%, massive improvements for UI, automatic error detection, improved user feedback, added option to copy results to clipboard, and more!
8.2.4
Relics and equipment expanded controls, filter relics and rewards to your hearts content
New auto detection, allowing WFINFO to display in non-endless missions even faster than before. As well as new auto-update feature!
8.1.0
WFInfo has a new overlay mode, now transparent and showing how popular an item is!
WFinfo has switched to a different style of collecting data, now getting bi-hourly updates on prices. This allows faster updating to incorrect prices without having to release an update
8.0.0
WFInfo now supports the new UI
Boasting the fastest times ever for WFinfo
7.3.0
WFInfo now supports windowed mode
Improved logging of screenshots allowing us to get down right to the detail on what goes wrong
7.2.0
A fix for 21:9 aspect ratios has been released
Improved logging of what happens, making it easier to debug
7.1.0
A new display type for relics, a separate window
The birth of this site!